ECG data analysing
The option to review uploaded ECG is available under the Review button.

Cardio.AI shows the following screen when successful:
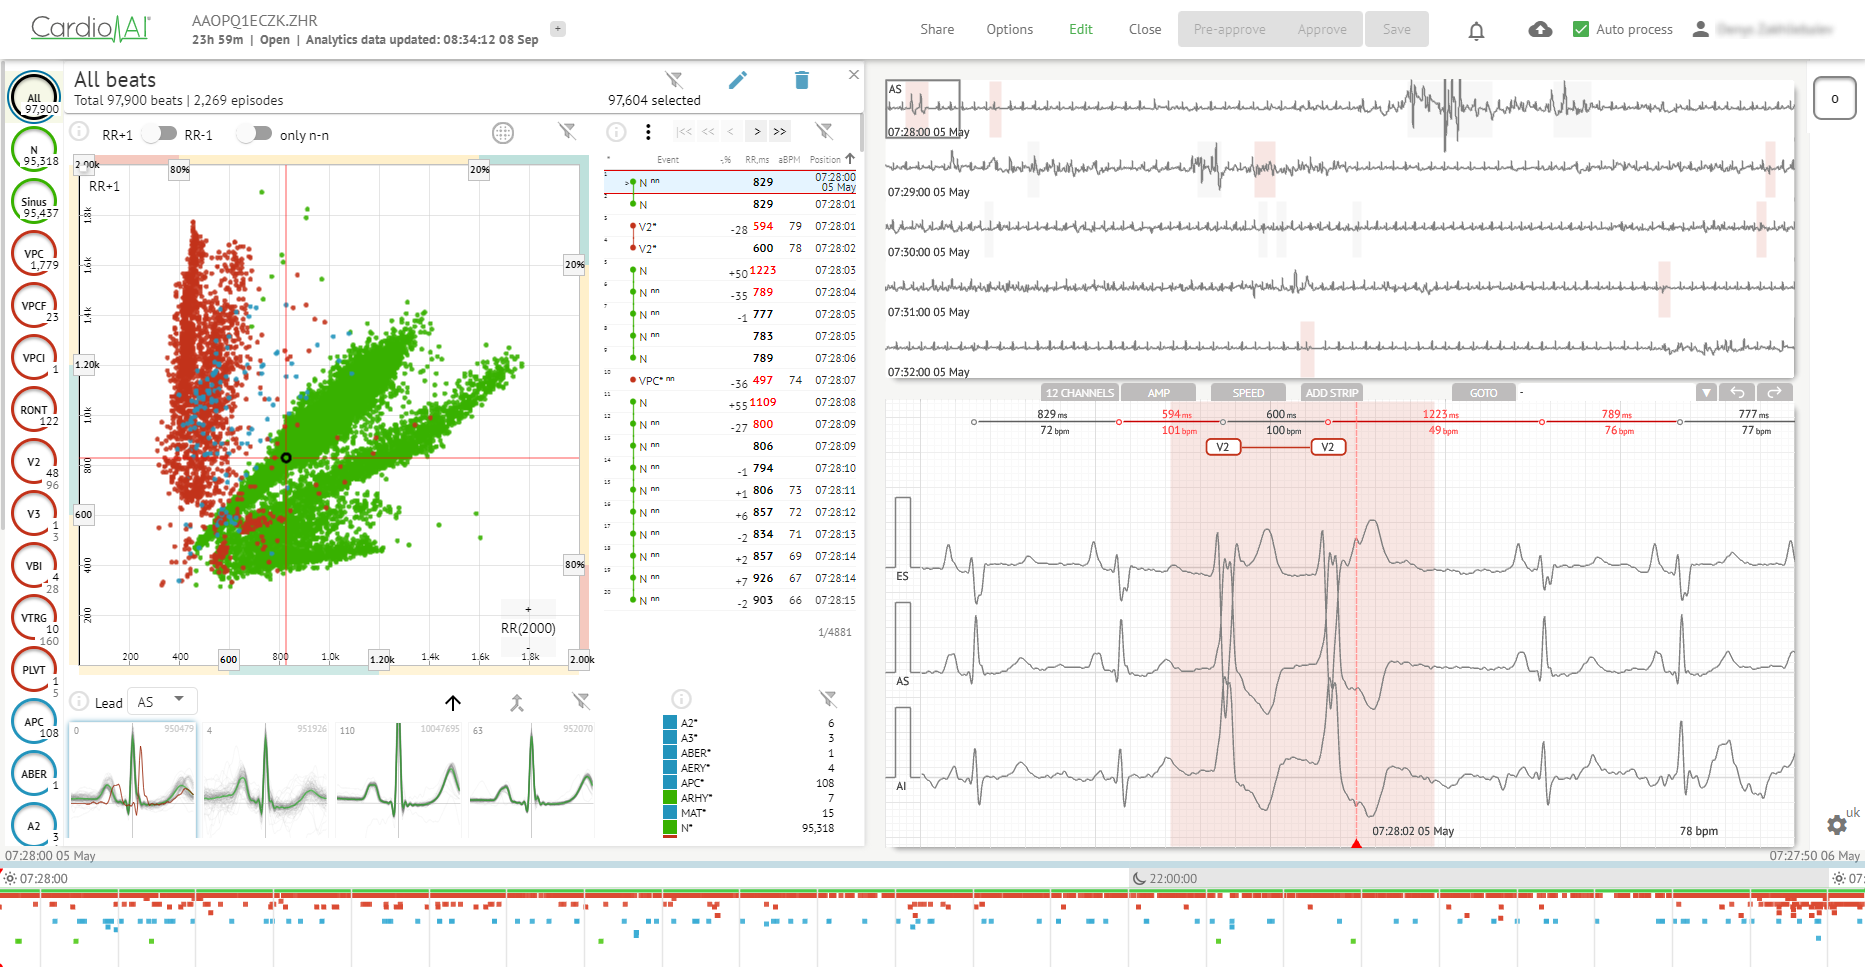
ECG viewer is divided into the following sections:
-
Header section - enables a user to manage ECG viewer options, save and approve the ECG.
-
Side editing bar - enables a user to choose the ECG periods;
-
Detailed ECG data section - enables a user to view and edit ECG;
-
A report section - enables a user to observe, edit and export the ECG report.
ECG Viewer Header
Header section of the ECG viewer contains the following information:
| Setting | Description |
|---|---|
| Logo | Indicates the logo of the organization:
|
| ECG file name | Indicates the name of the ECG file.
|
| Duration of the ECG record | Indicates the duration of the ECG record in days, hours and minutes if applicable.
|
| Status of the task | Indicates the status of the task:
|
| Update date | Indicates the time and date of last update of task data:
|
| Task tags | Indicates the tags of the task:
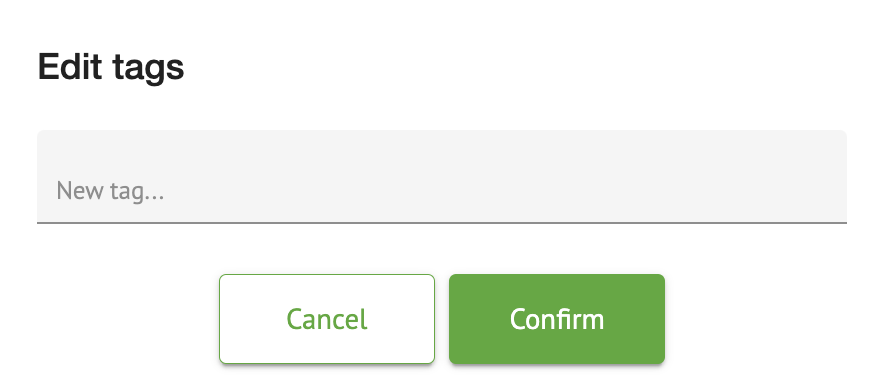
The option to add tag is available by clicking under Add tag button:
Or via clicking the existing tag.\ Cardio AI shows the following screen when successful:
|


 \ The option to add a new tag is available by filling the name of the tag under New tag... field and clicking the Confirm button.\ The option to remove existing tag is available by clicking the remove button under existing tag:
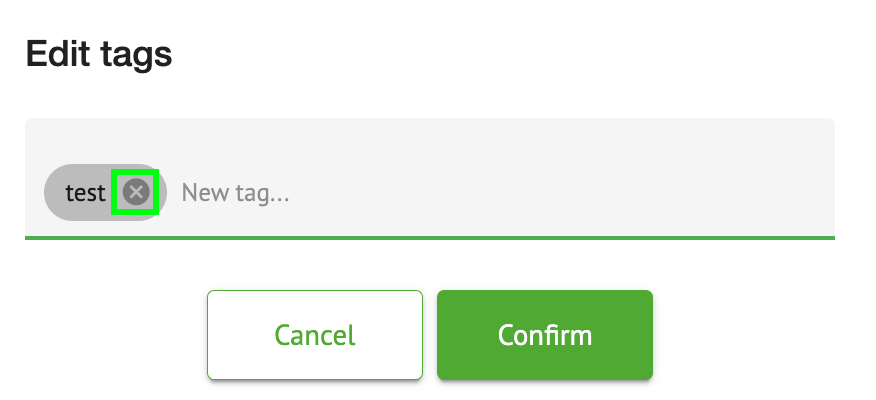
Share ECG task
The option to share task is available under Share button:

Shareable link will be copied to the clipboard.
ECG task options
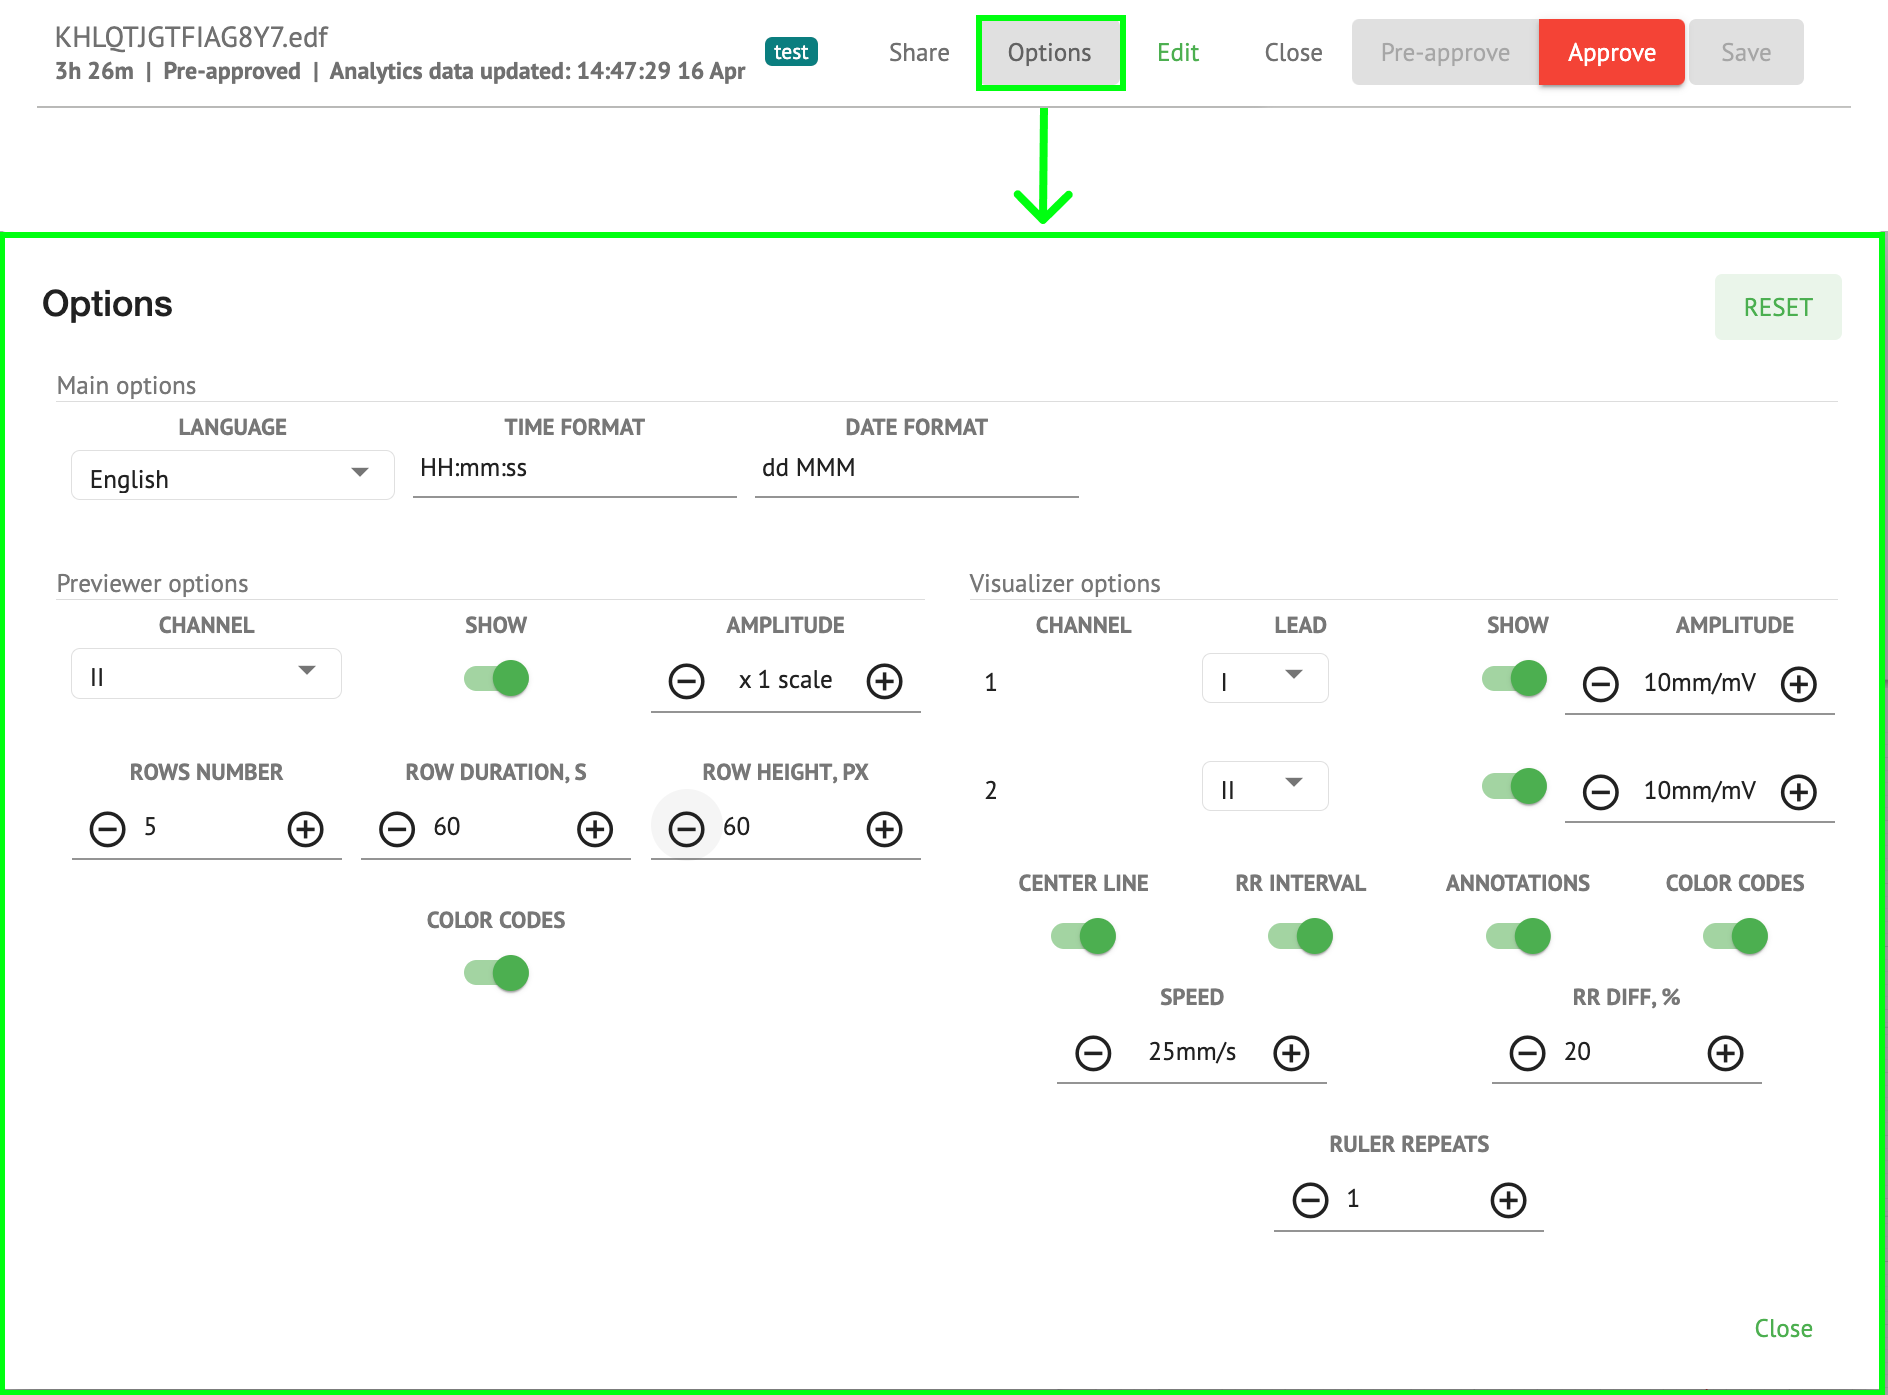
The ECG task options are available under Options button:
| Setting | Description |
|---|---|
| Main options | |
| Language | Enables to set the language of task viewer. The following languages available:
|
| Time format | Enables to set the time format of the task data. |
| Date format | Enables to set the date format of the task data. |
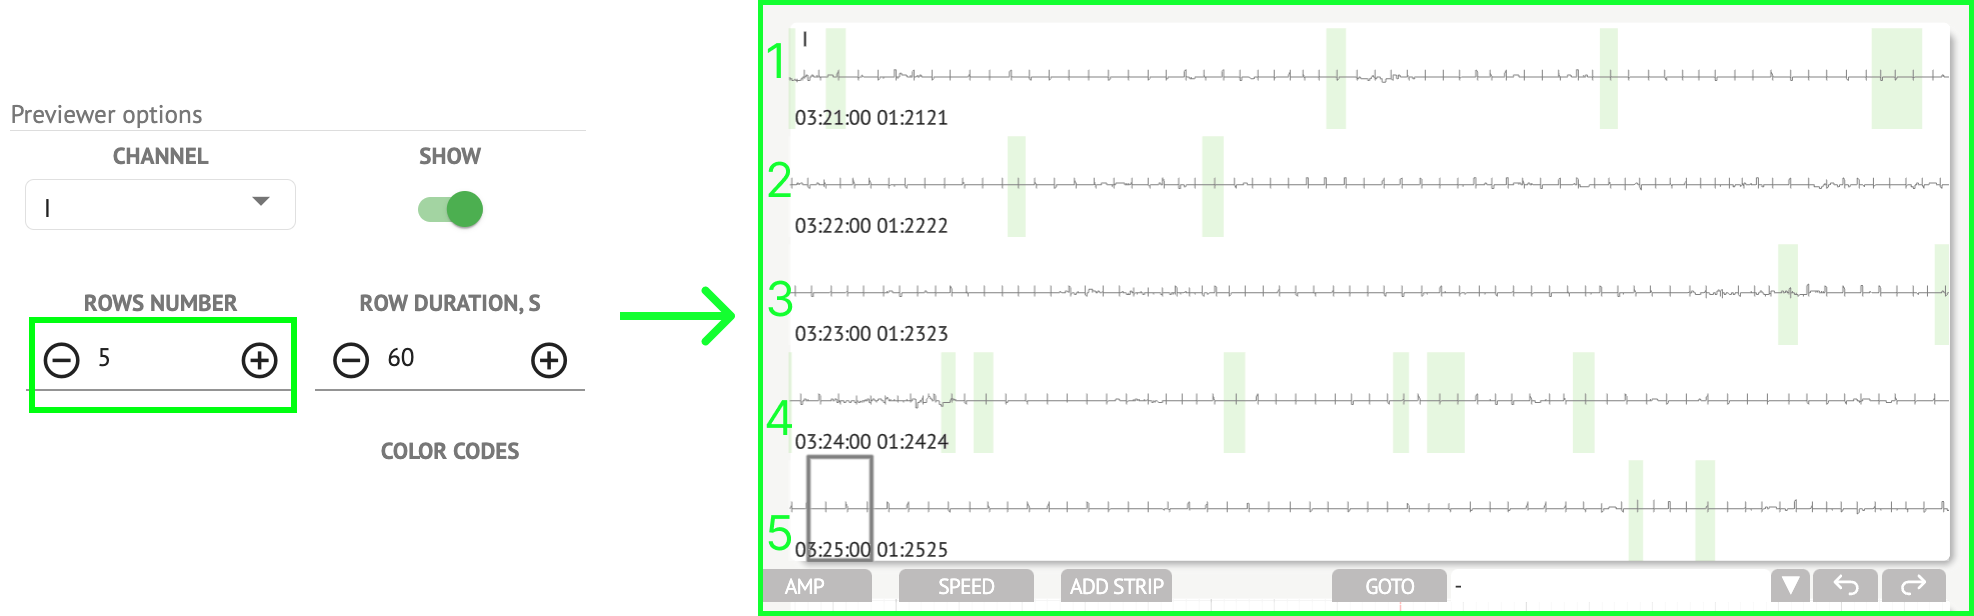
| Previewer options | |
| Channel | Enables to select the channel for configuration. The available channels correspond to ECG recording device. |
| Show | Enables to show or hide the channel. |
| Amplitude | Enables to configure scaling of the amplitude. The available scales are:
The option to change scaling is available under Plus and Minus buttons. |
| Rows number | Enables to set the number of rows under Previewer. The number of rows available from 1 to 20. The default value is 5.
|
| Row duration, s | Enables to set the duration of rows, in seconds. The following values available:
|
| Row height, px | Enables to set the height of rows, in pixels. The following values available:
|
| Color codes | Enables to set the color codes of annotations availability under Previewer. |
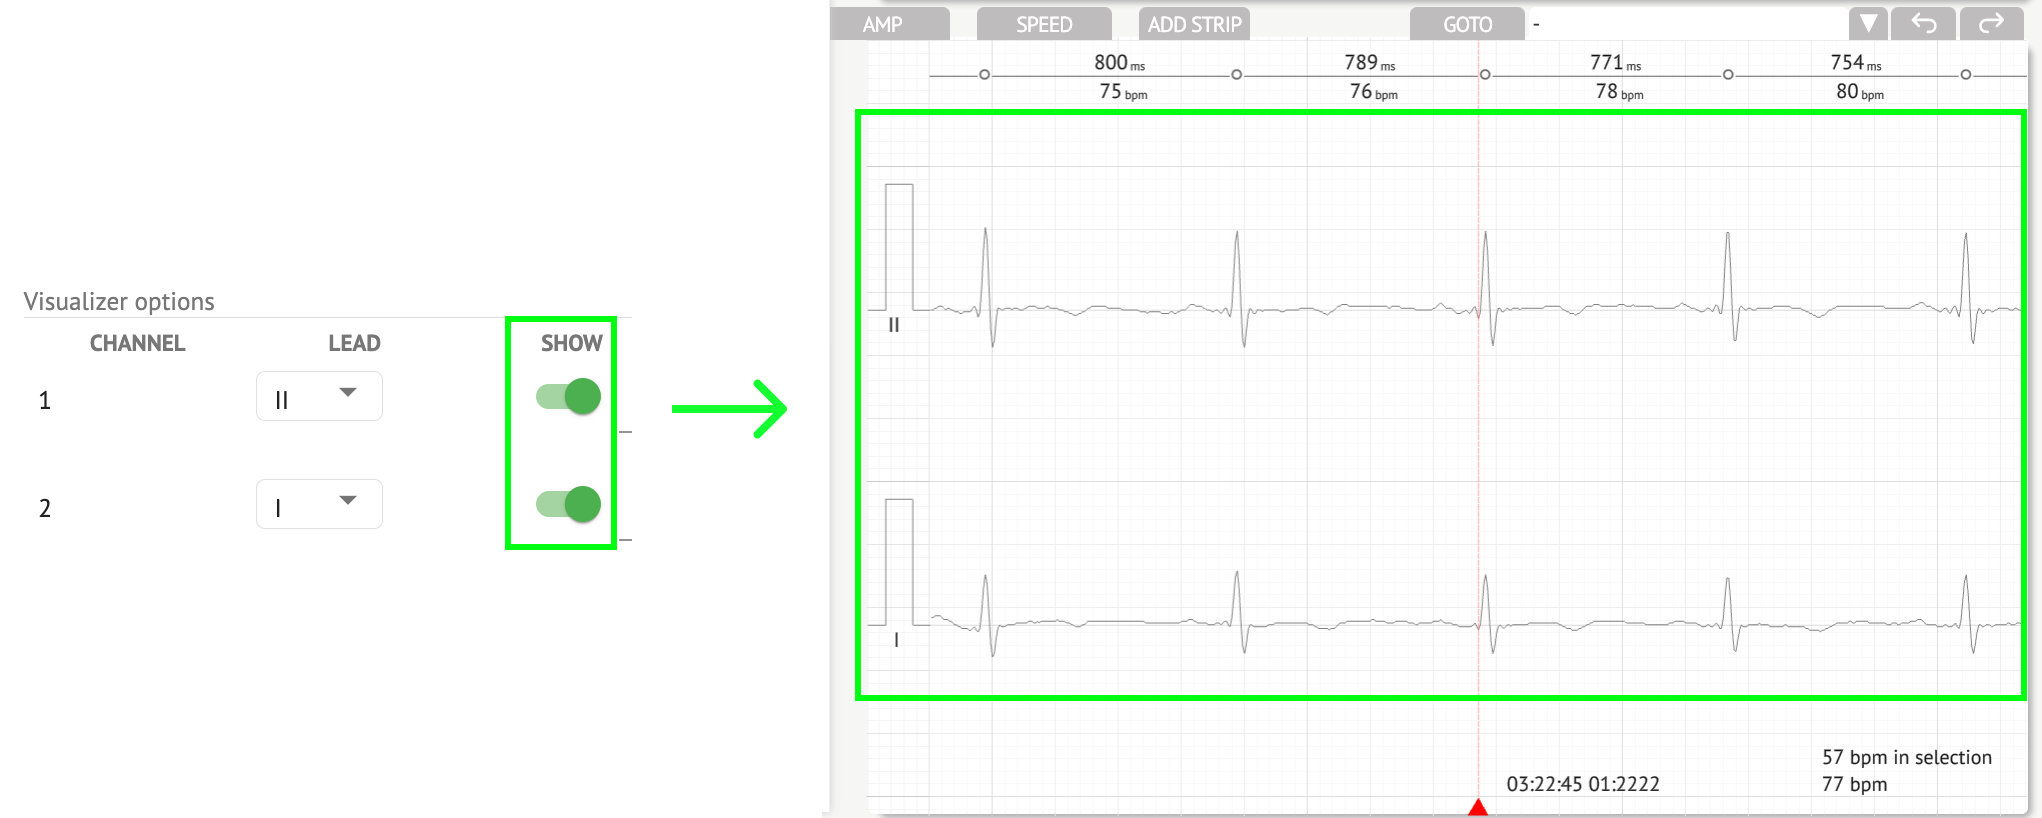
| Visualizer options | |
| Channel | Enables to select the channel for configuration. The available channels correspond to ECG recording device. |
| Lead | Enables to select the channel lead for configuration. The available leads correspond to ECG recording device. |
| Show | Enables to show the channels under Visualizer.
|
| Amplitude | Enables to set the amplitude of the leads under Visualizer. The following amplitudes available:
The option to change Amplitude is available under Plus and Minus buttons. |
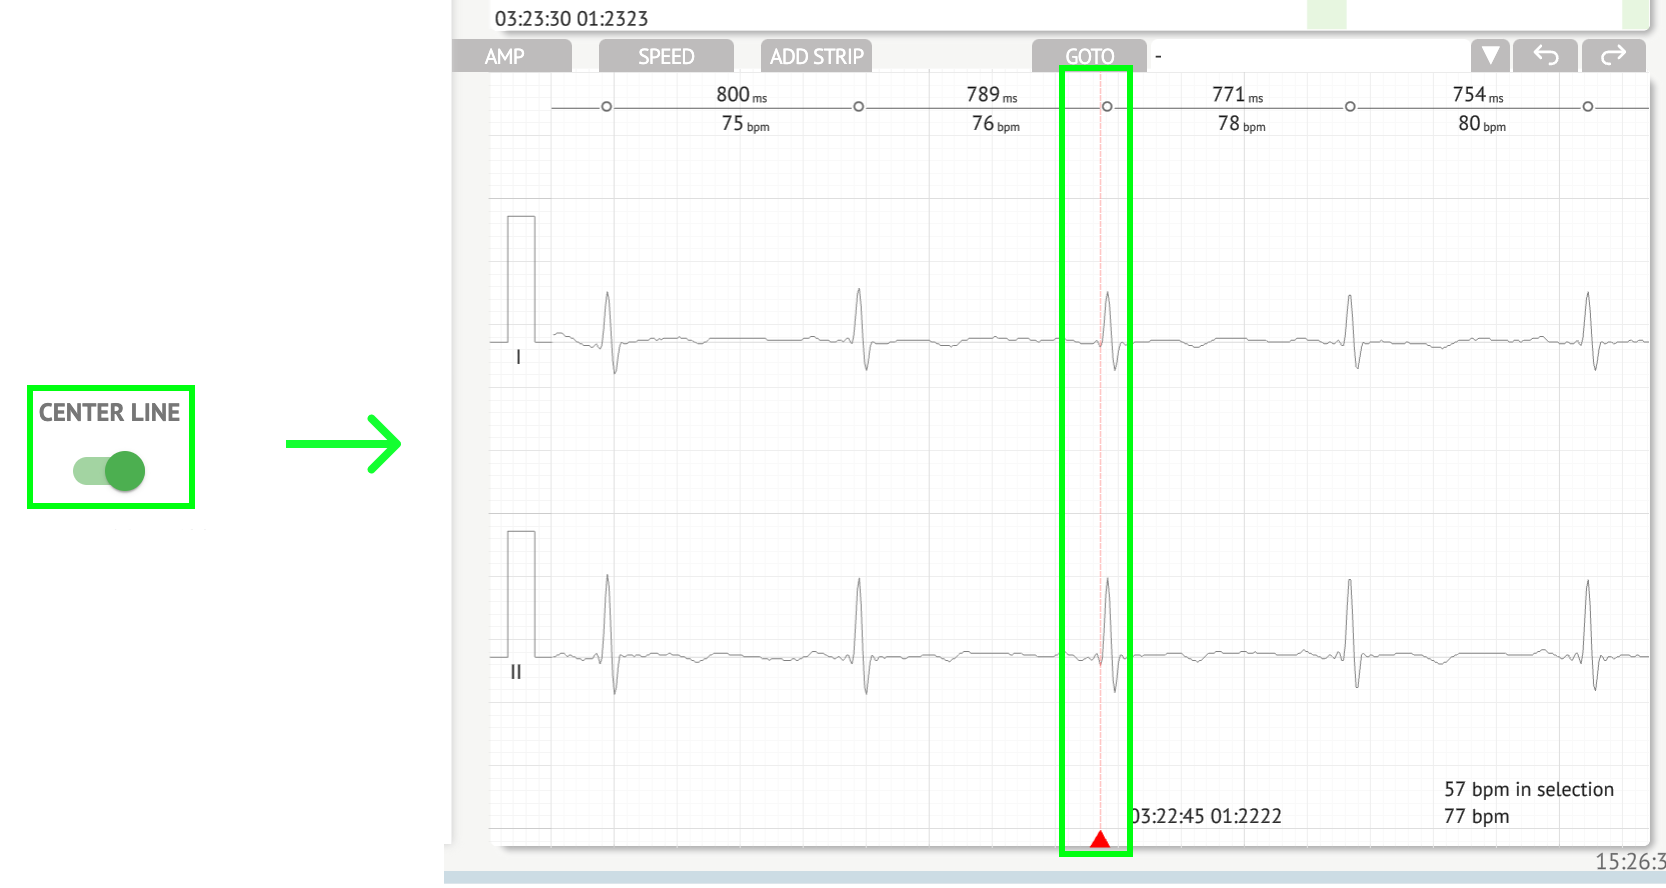
| Center line | Enables to show the Center line under Visualizer:
|
| RR interval | Enables to show the time interval between two successive R-waves of the QRS signal under Visualizer:
|
| Annotations | Enables to show the text codes of annotations under Visualizer. |
| Color codes | Enables to show the color codes of annotations under Visualizer. |
| Speed | Enables to set the speed of the record under Visualizer. The following speed options available:
|
| RR diff, % | Enables to set the the percentage difference between successive R-R intervals. The following values available from 0 to 100 |
| Ruler repeats | |

The option to reset changes is available under Reset button.
The option to save changes is available under Save button.
Edit ECG task
The option to make the Record editable is available under the Edit button:

Close ECG task
The option to close ECG task and revert to Tasks section is available under Close button:

Pre-approve ECG task
The option to pre-approve task is available under the Pre-approve button:

Note. Task pre-approving is available only after Saving the task.
Approve ECG task
The option to approve ECG task and download the report in PDF format is available under the Approve button:

Note. Task approving is available only after Saving the task.
Save ECG task
The option to save changes after editing the ECG task is available under Save button:

Cardio.AI shows the following notification when successful:

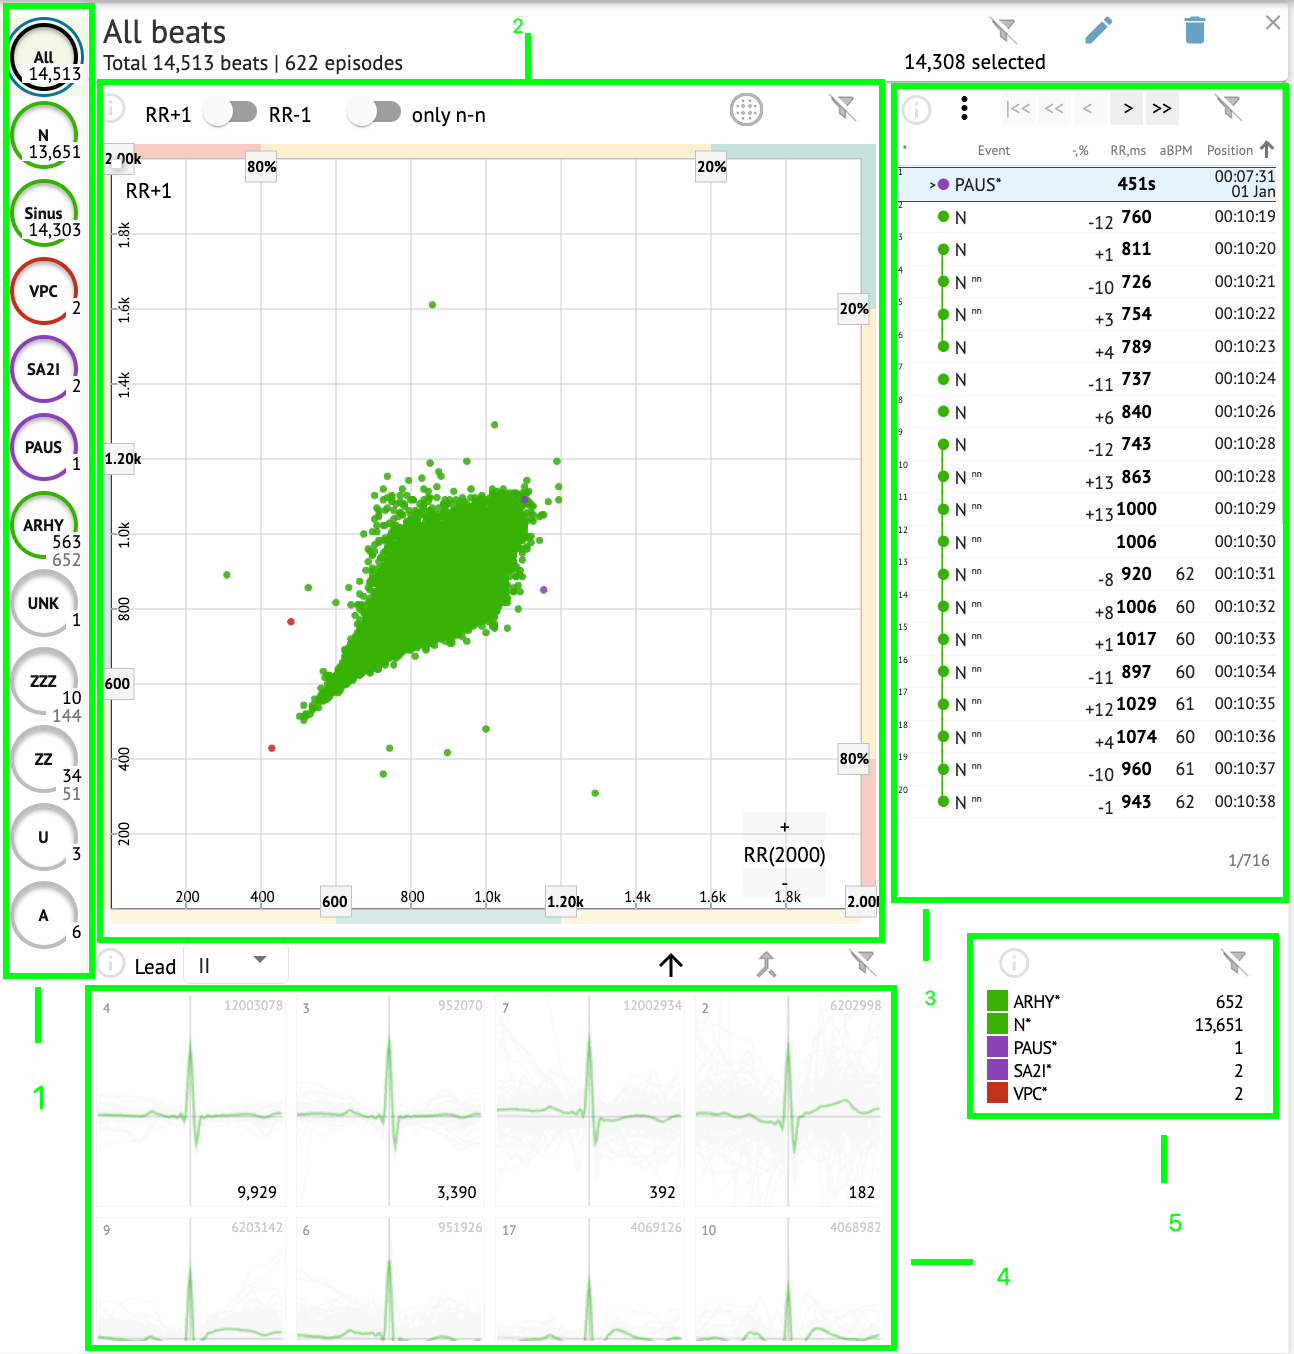
ECG Viewer Editor
ECG Viewer Bulk Editor consists of the following elements:
-
Side editing bar - contains all and classified beats by annotations;
-
Poincare plot - enables to navigate and select beats;
-
Beats list - enables to bulk select and edit beats
-
Beats cluster panel - enables to compare beats via clusters;
-
Beats cross-annotations list - enables to observe and manage beats with multiple annotations.
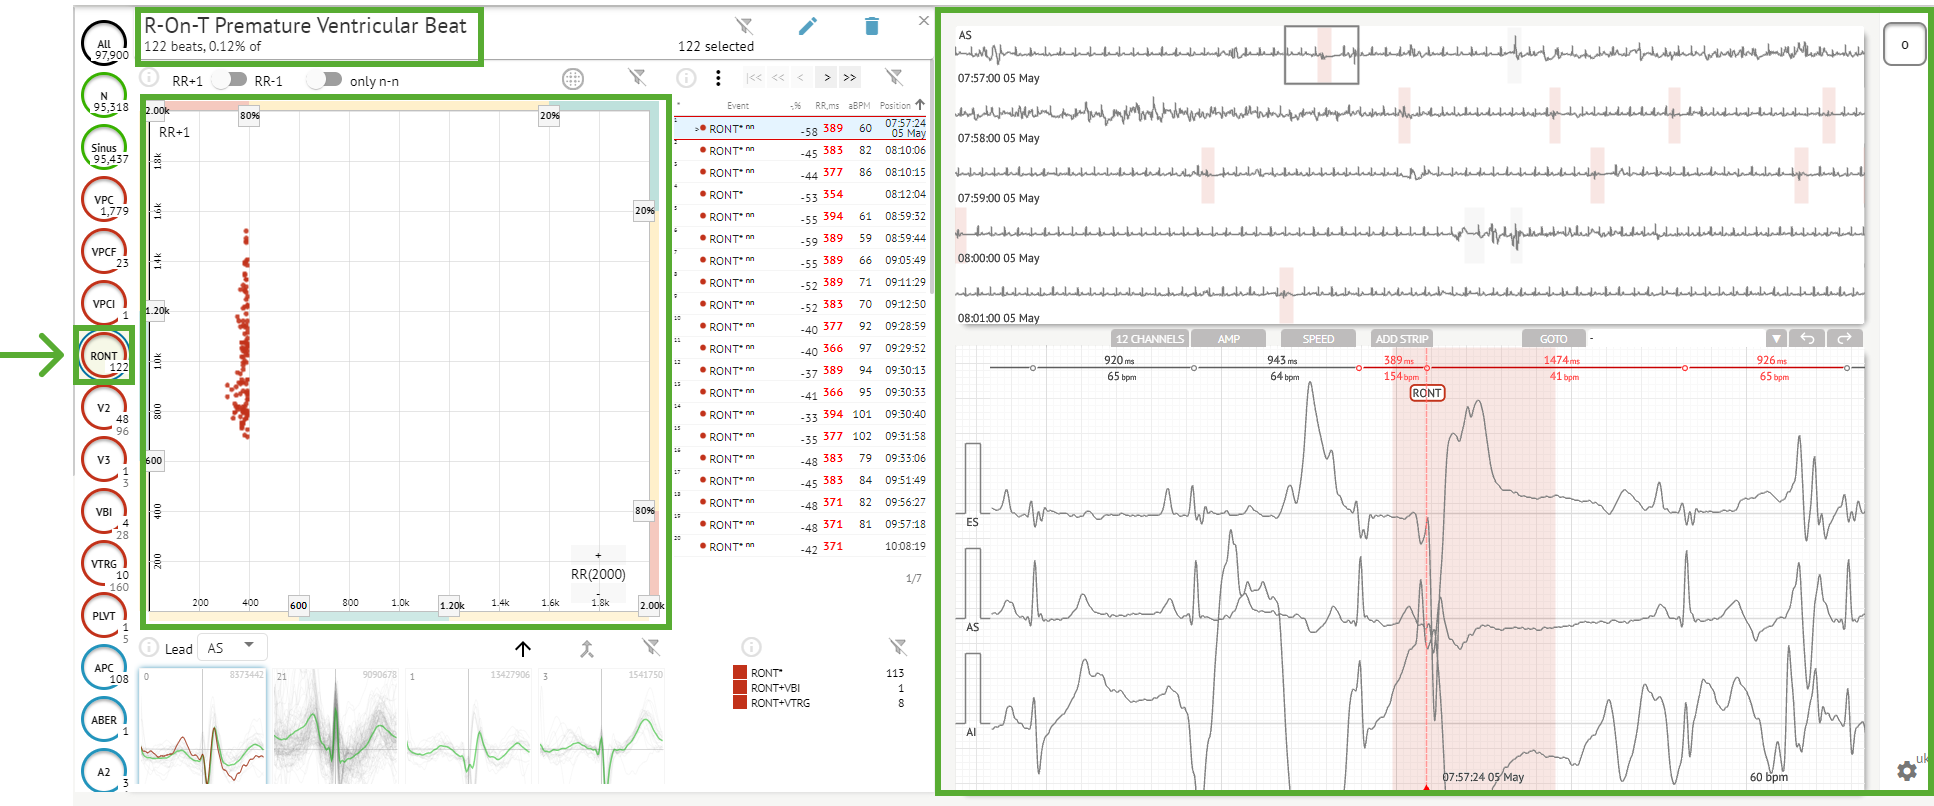
Side editing bar
Under side editing bar, Cardio.AI collects and shows all the beats, normal beats and found annotations. All beats highlighted with black, normal and sinus beats highlighted with green, annotations highlighted with other colors.
The user is enabled to click on the highlighted segments, and software will focus on that selected segment, including a detailed view of the selected segment:
Multi selection of episodes is available via SHIFT or CTRL buttons.
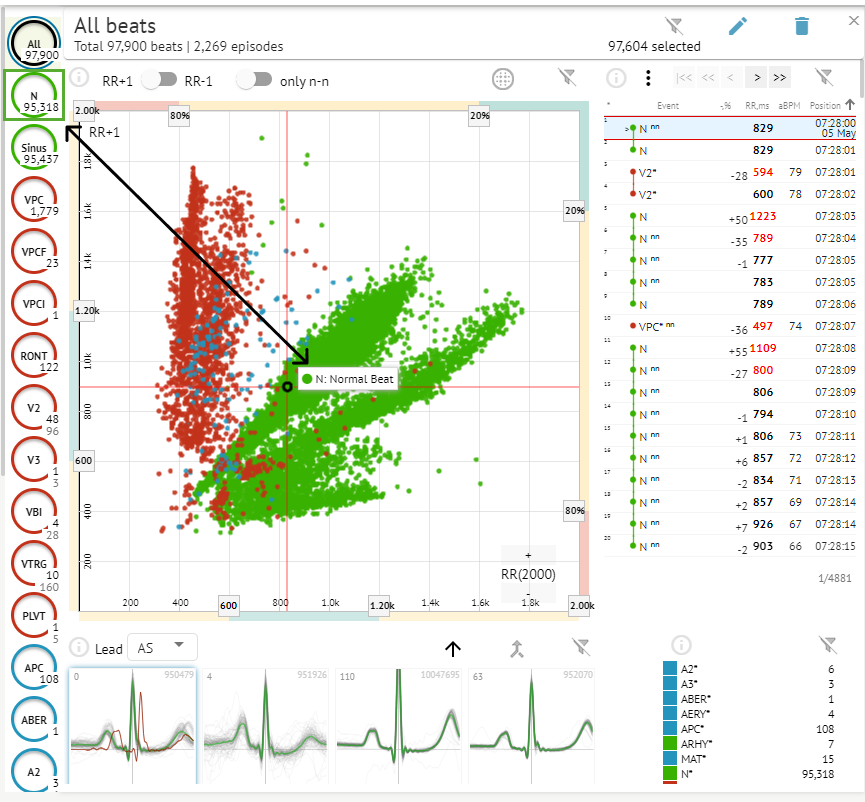
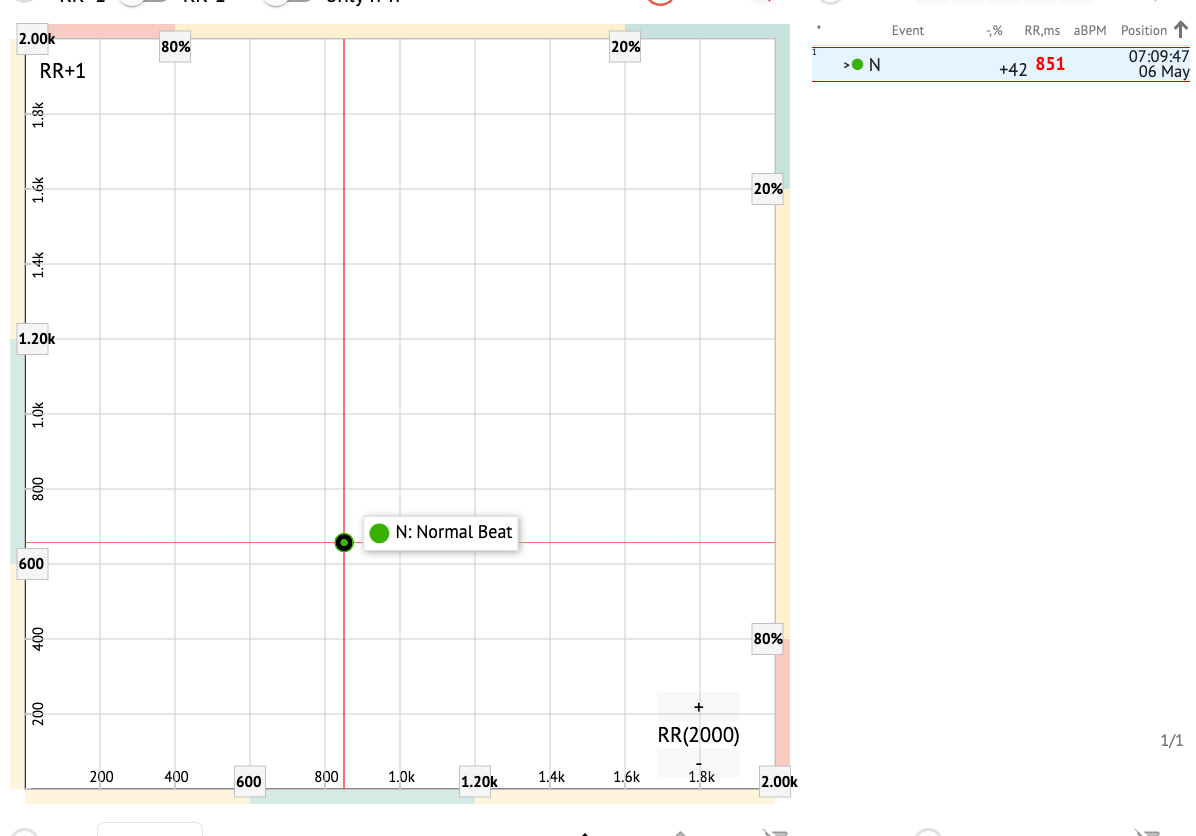
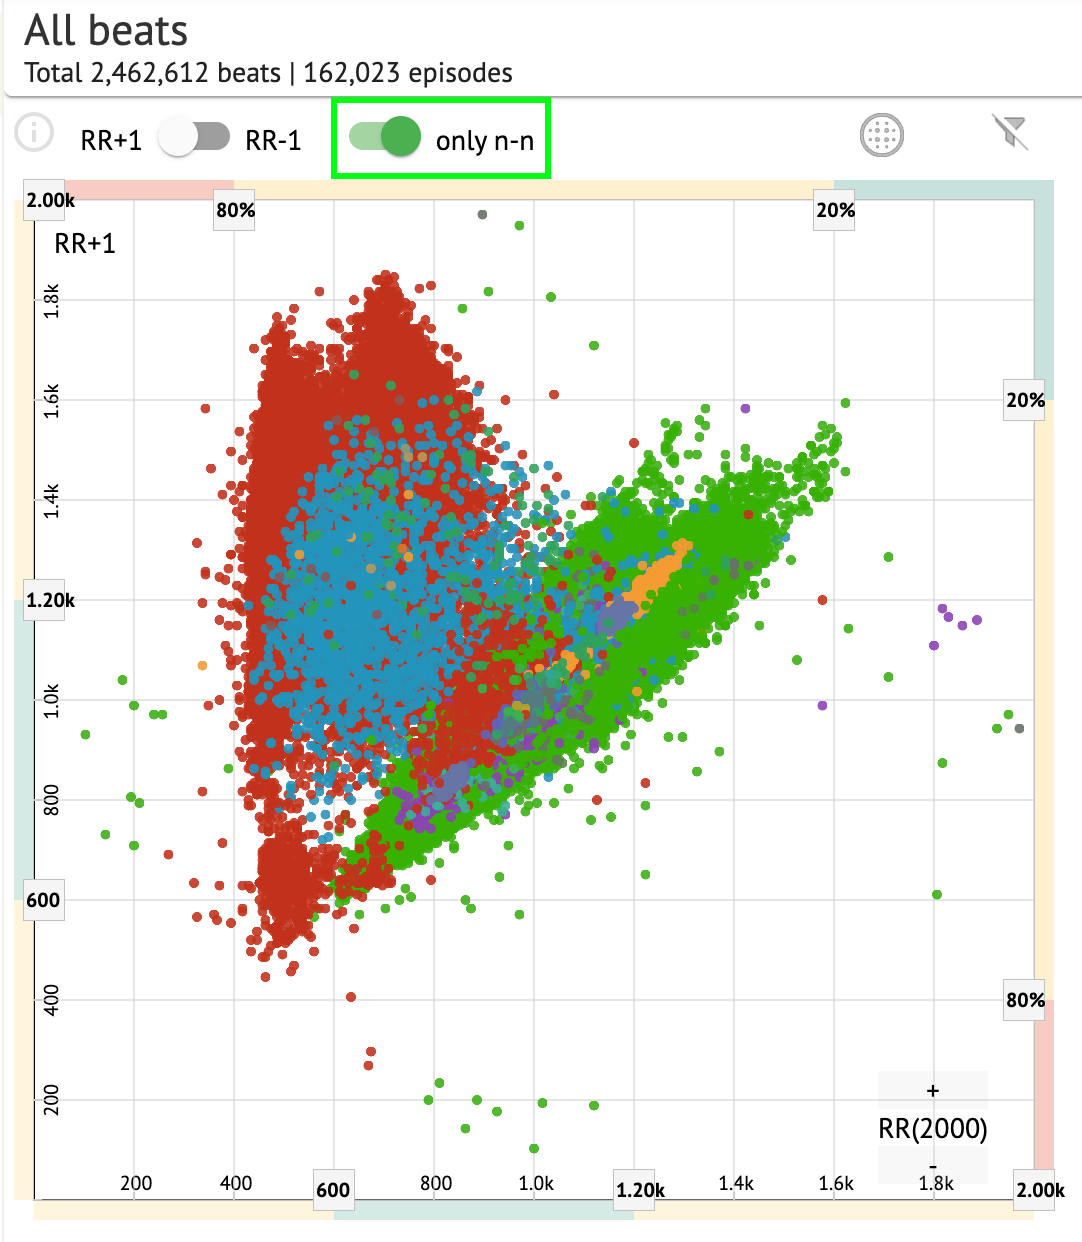
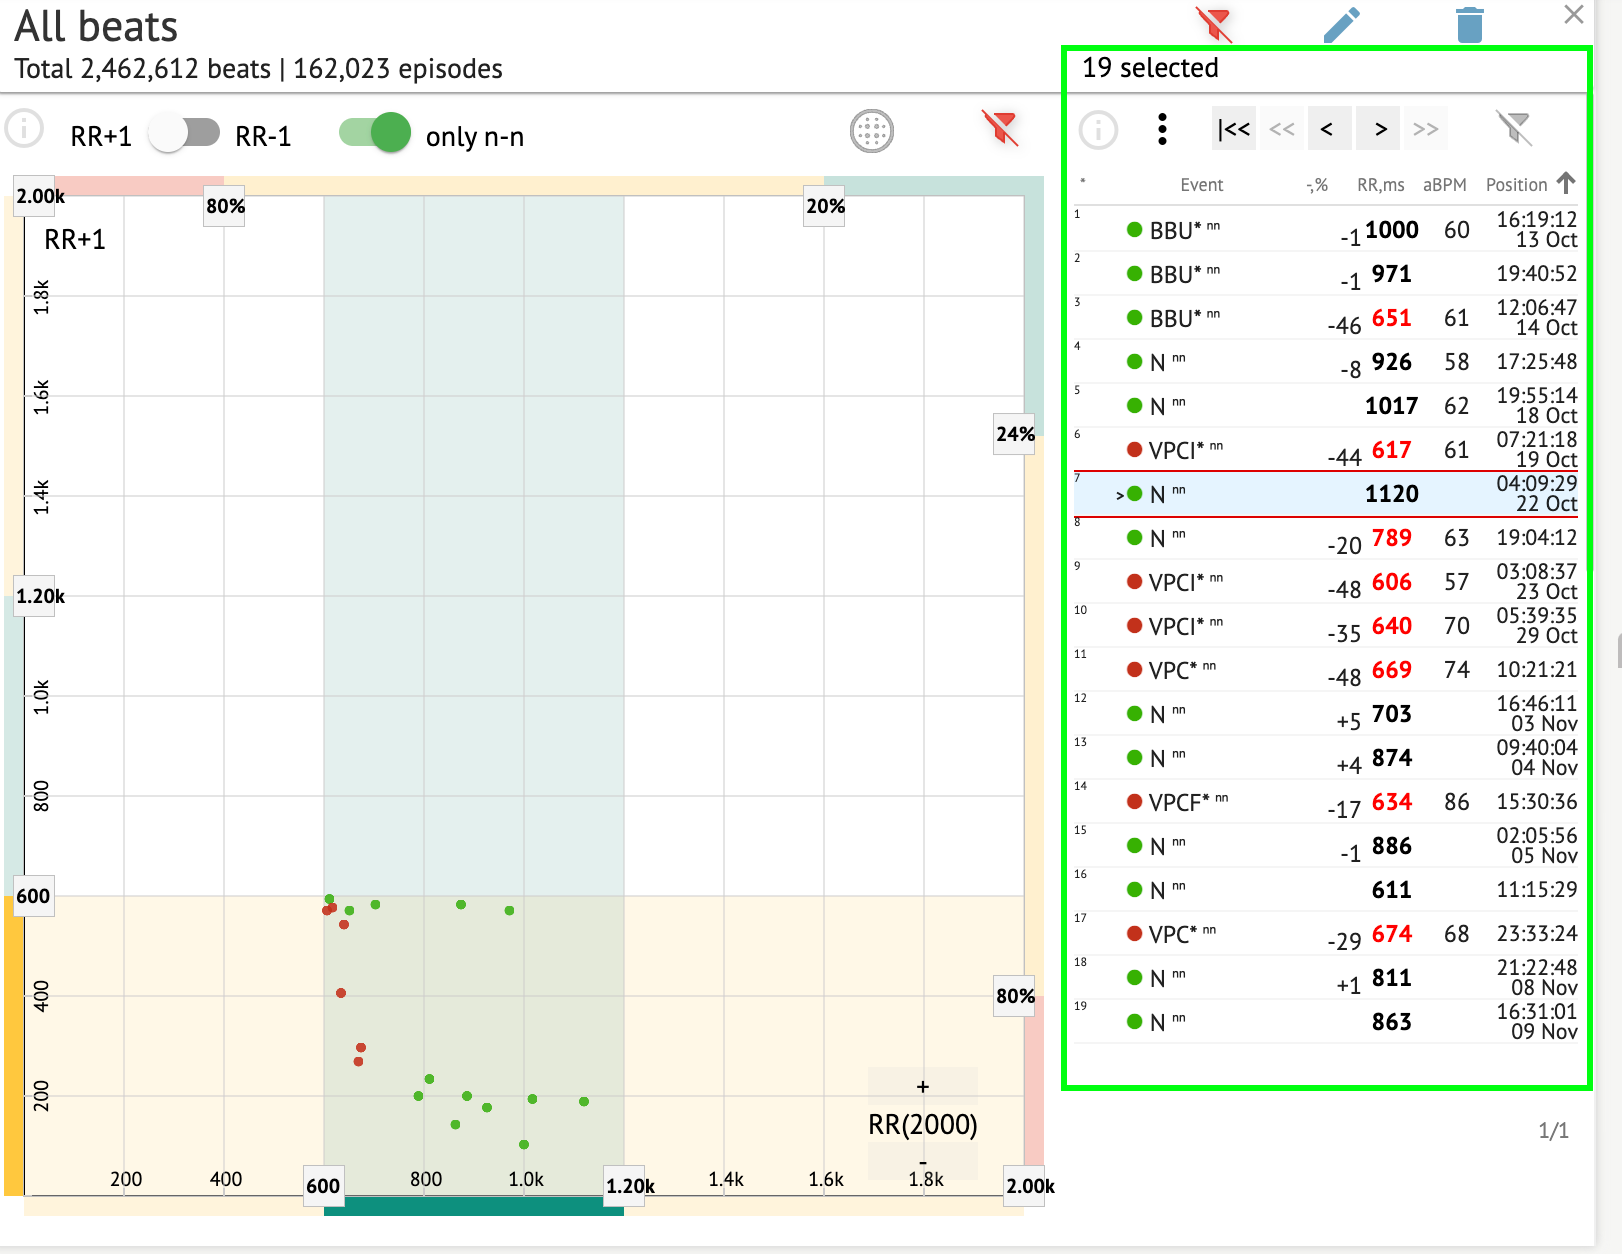
Poincare plot
Poincare plot enables a user to review, view and navigate all recorded beats, including normal, and annotations (abnormalities)
The option to navigate to beat is enabled by clicking on the beat:
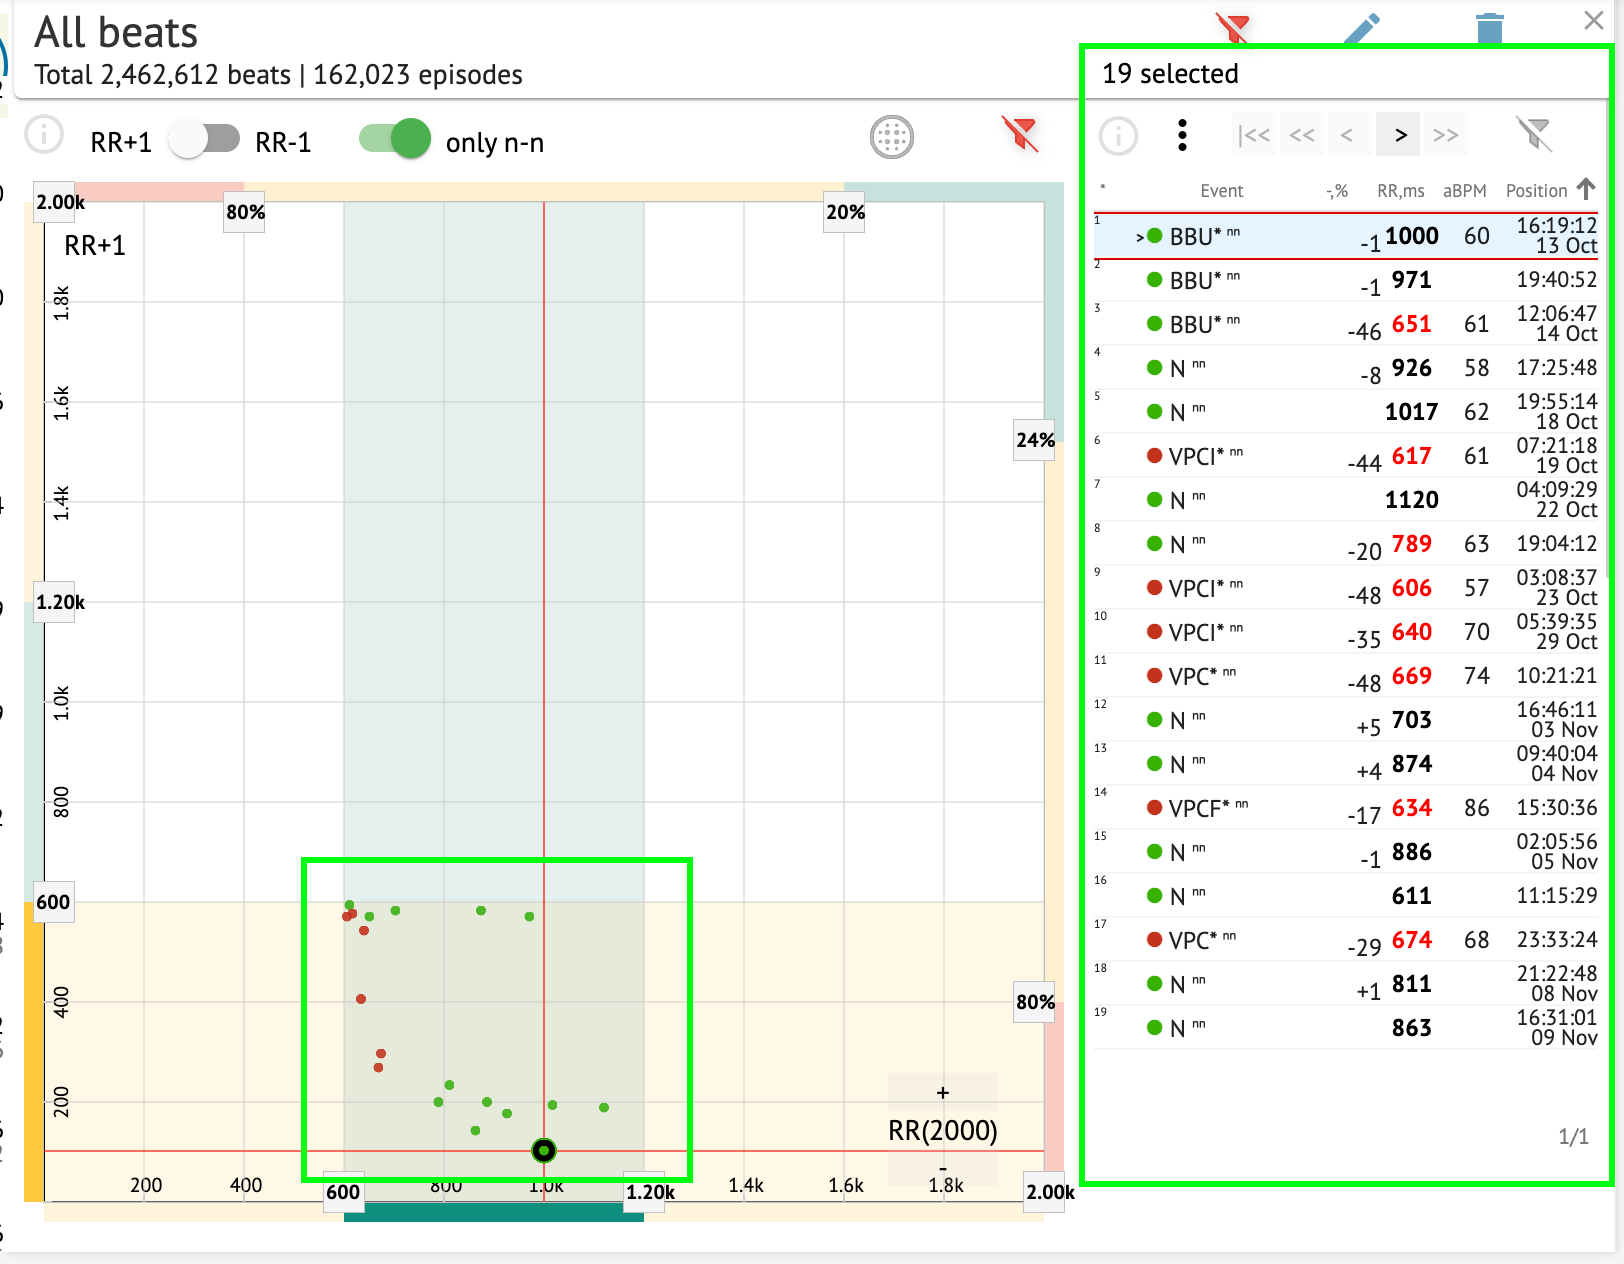
The user has the ability to select multiple bits by drawing an area on the Poincare plot by left-clicking and moving the cursor over the plot:
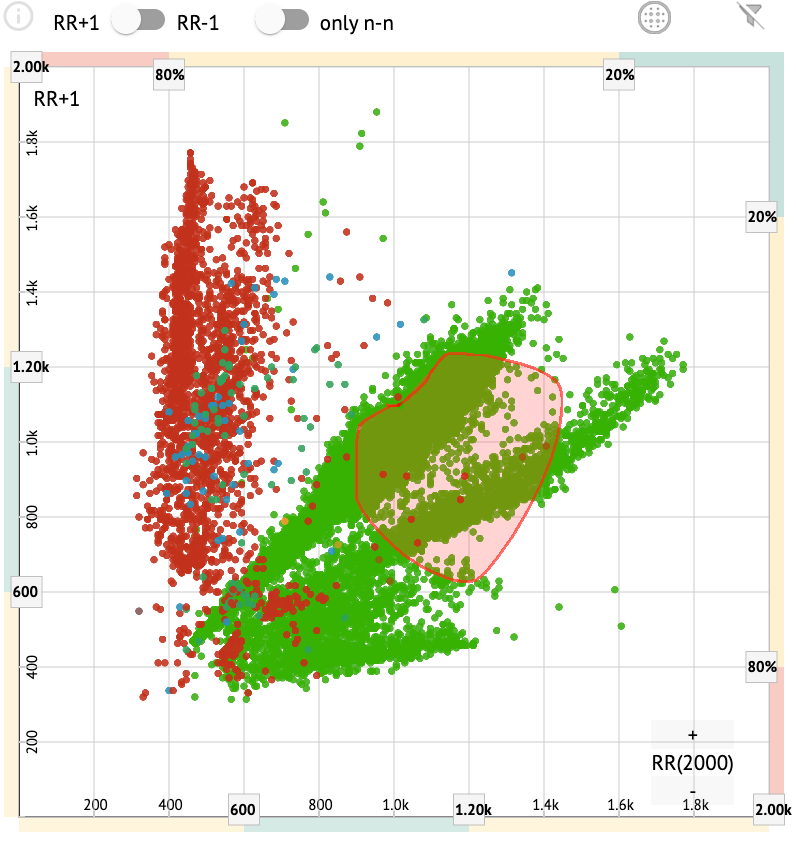
By default, Poincare plot is shown in the mode RR +1. The option to switch to RR-1 mode is available under the corresponding switch:

The option to show only normal beats to the left and to the right is available under only n-n switch:
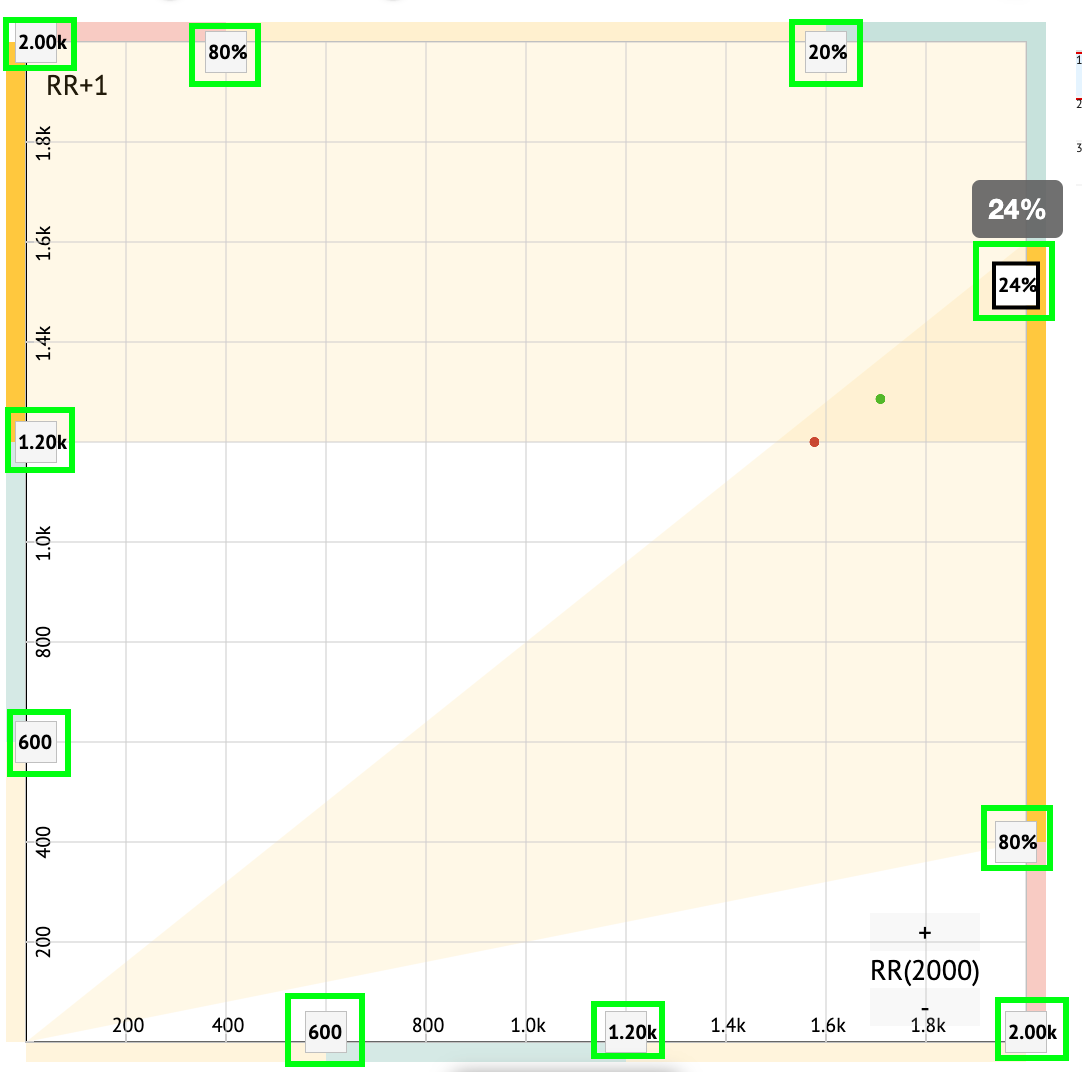
The option to filter beats under Poincare plot is available by clicking on the following filter elements:
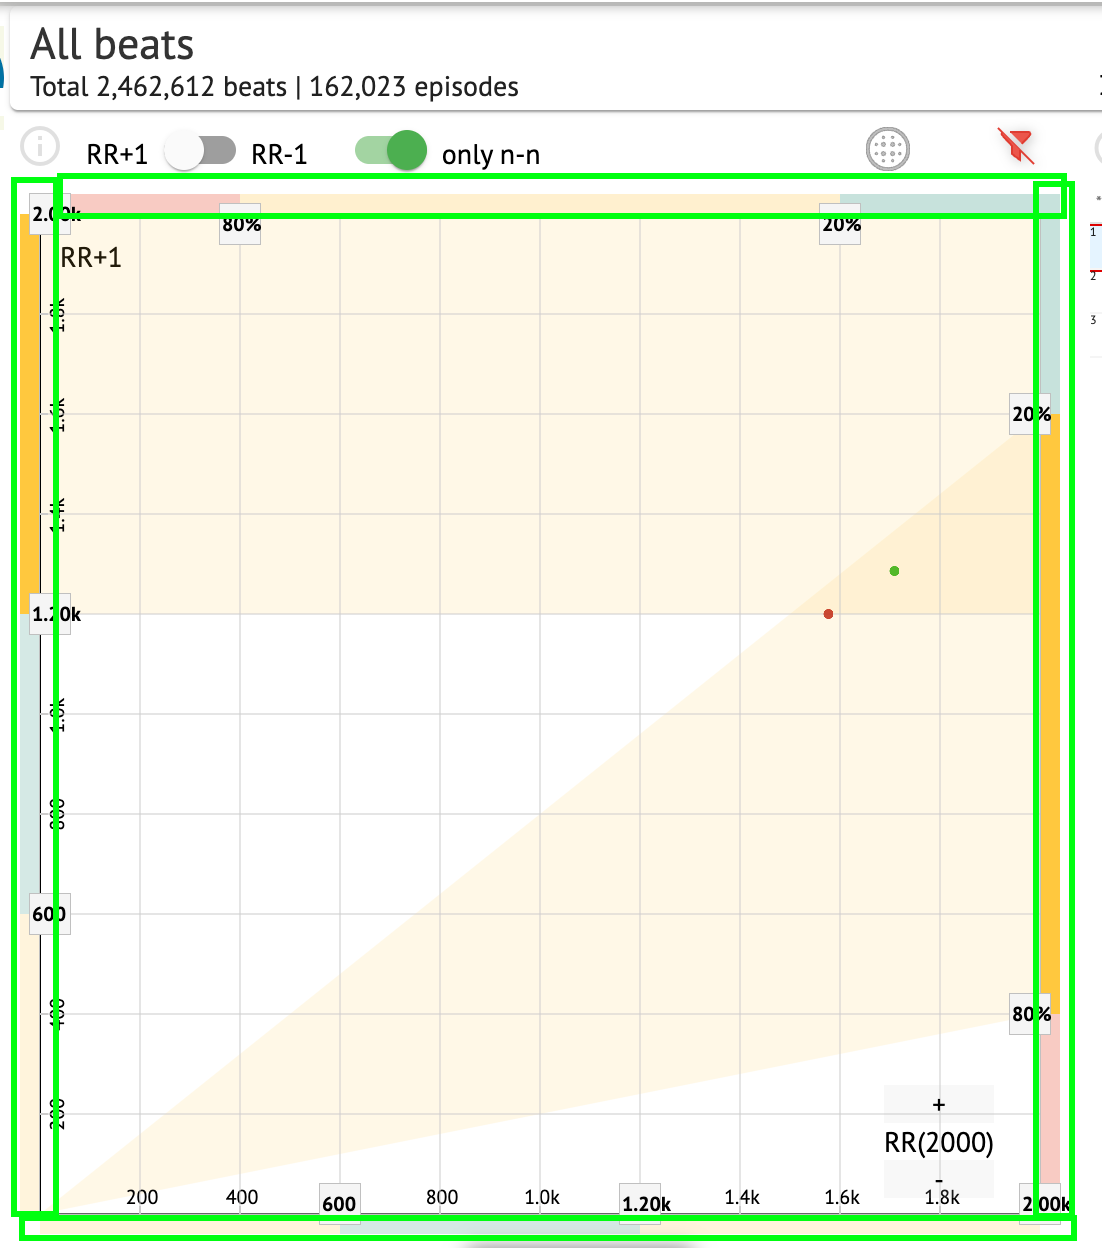
The user is enabled to change the length of filter element by moving the filter elements borders by clicking them and moving the cursor:
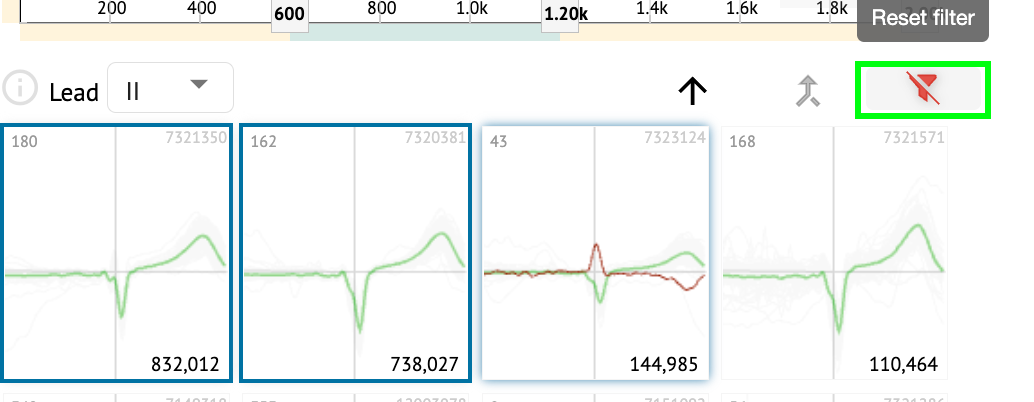
Filtered beats are displayed under the Beats list:
The option to reset filter is available under Reset filter button:

When filtered and selecting the single beat, the option to revert to a filter view is available under the following button:

Beats list
Beats, selected under the Side editing bar or Poincare plot are displayed under the Beats list:
Setting Description
* Indicates the number of the beat within the beats under the Poincare plot.
Event Indicates the name of the annotation correspondent to the beat.
-,% Indicates the difference in % between the beat and the beat which is left to the beat.
RR,ms Indicates the distance in ms between the beat and the beat which is left to the beat.
aBPM Indicates the average BPM of the beat (calculated for the 6 seconds).
Position Indicates the position (time) of the beat location on the ECG recording
The user is enabled to filter the settings in ascending and descending order by clicking on the setting in the column:\ 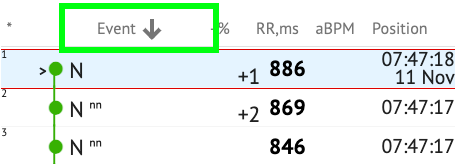
The option to select beat is available by clicking on the beat. The following options available to navigate within beats:
-
 (Spacebar)- enables to select the next beat;
 -
 (CTRL + Spacebar) - enables to select the previous beat;
 -
 - enables to select the next twentieth beat;
 -
 - enables to select the previous twentieth beat;
 -
 - enables to select the first beat.
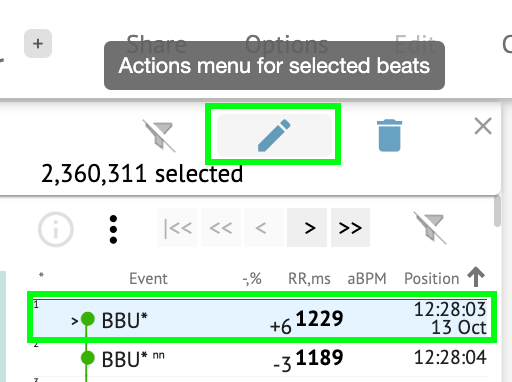
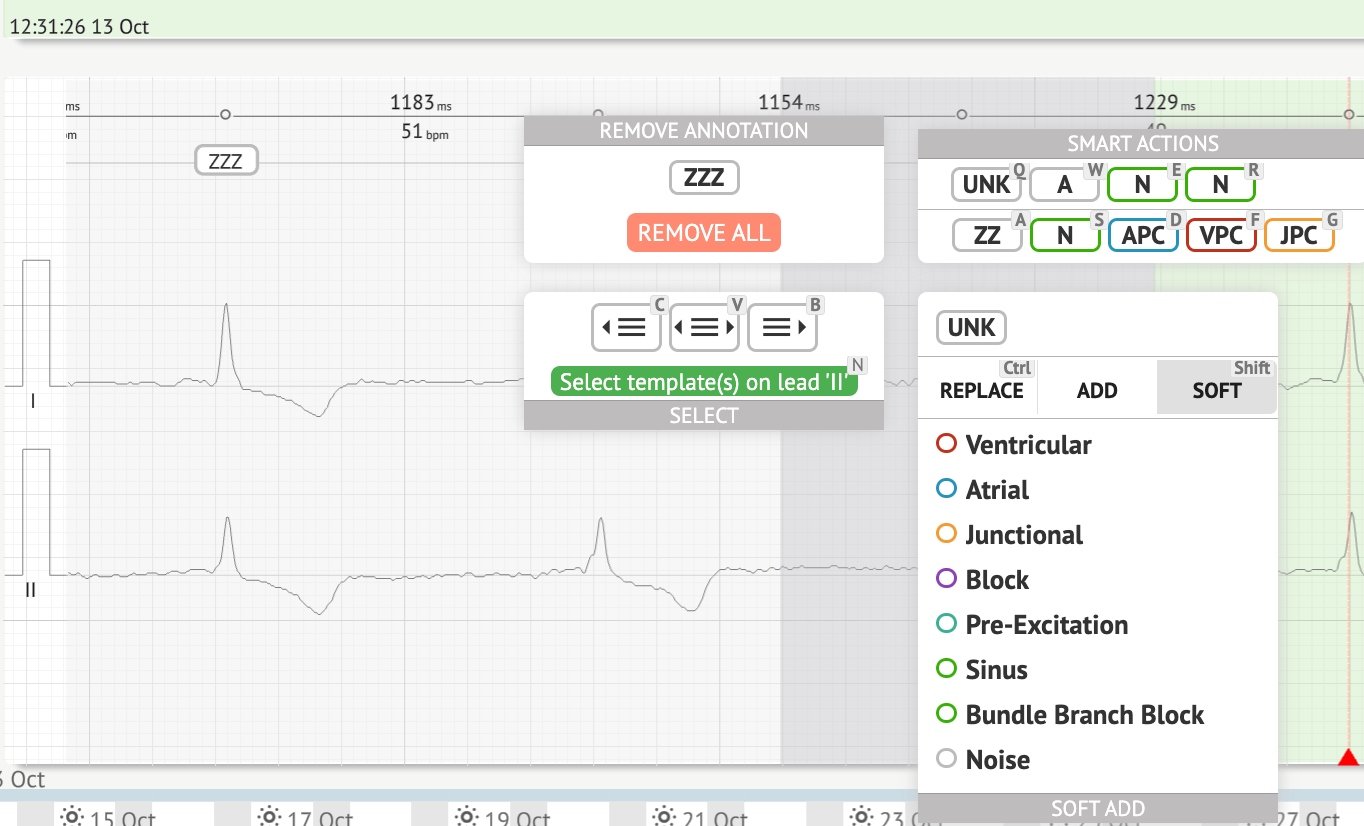
The option to access editing menu of the beats under Beats list is available by clicking the right button while selecting the beats, or via Edit button:
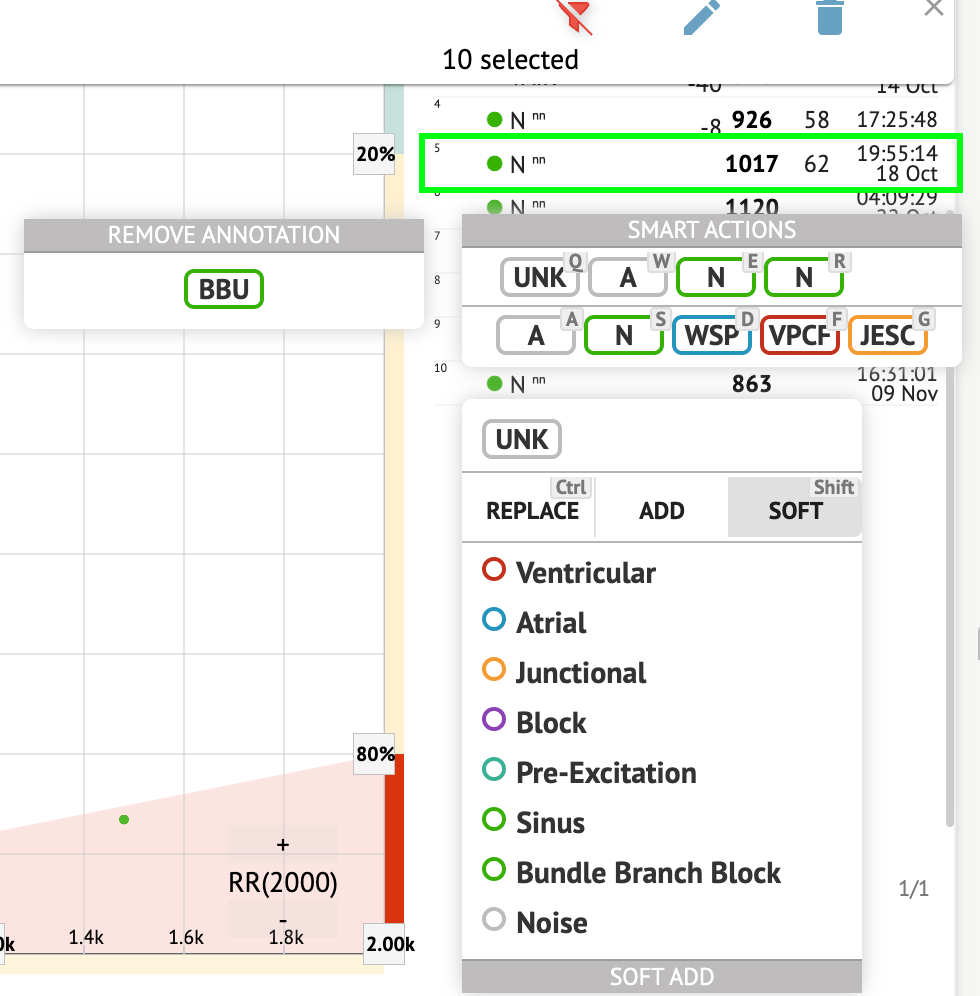
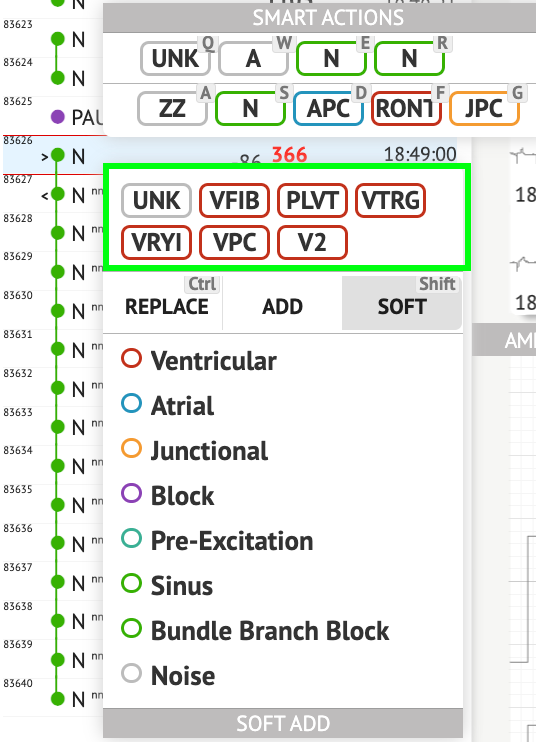
Smart actions
Smart Actions - the Editing menu, enables a user to manage beats within the Viewer and Visualizer sections of ECG task.
The following sections available under Smart Actions menu:
-
Remove annotation - indicates the existing annotation, applied to the beat. When clicking - removes the annotation and classifies the beat as normal. Available only for abnormal beats.
-
History of Smart actions, with the recently applied annotations:
 \ Note.Smart actions history differs within the number of selected beats (1-3, 4+).
 -
Replace - when enabled, allows to replace the beat with another annotation;
-
Add - when enabled, allows to add the annotation to the beat. When using Add option, the added annotation replaces the previous annotation, if applicable. ;
-
Soft - when enabled, allows to soft add the annotation to the beat. When soft adding, the added annotation does not replace the previous annotation, if applicable.;
The following annotations available under **Smart actions:\ **
- Ventricular - contains the following annotations:\ VPC - Ventricular Premature Contraction;\ VPCF - Fusion of Ventricular And Normal Beat;\ VPCI - Ventricular Interpolated Beat;\ RONT - R-On-T Premature Ventricular Beat;\ VESC - Ventricular Escape Beat;\ V2 - Ventricular Couplet;
V3 - Ventriculat Triplet;\ VBL - Ventricular Bigeminy;
VTRG - Ventricular Trigeminy;
VFIB - Ventricular Fibrillation;
VFLU - Ventricular Flutter;
VTDP - Torsades De Pointes Ventricular Tachycardia;
MOVT - Monomorphic Ventricular Tachycardia;
PLVT - Polymorphic Ventricular Tachycardia;
VRYI - Idioventricular (Ventricular Escape) Rhythm;
VAIR - Accelerated Idioventricular Rhythm;
- Atrial - contains the following annotations:\ APC - Atrial Premature Contraction;
ABER - Aberrated Beat;
NPW - Non-Conducted P-Wave (Blocked);
AESC - Atrial Escape Beat;
A2 - Atrial Couplet;
A3 - Atrial Triplet;
ABI - Atrial Bigeminy;
ATRG - Atrial Trigeminy;
AFIB - Atrial Fibrillation;
AFLU - Atrial Flutter;
PAT - Paroxsysmal Atrial Tachycardia;
MAT - Multifocal Atrial Tachycardia;
AAT - Automatic Atrial Tachycardia;
AERY - Atrial Ectopic Rhythm;
WSP - Wandering Sinus Pacemaker Within The Sinus Node;
ARYU - Upper Atrial Rhythm;
ARYM - Middle Atrial Rhythm;
ARYL - Lower Atrial Rhythm;
- Junctional - contains the following annotations:\ JPC - Junctional (Nodal) Premature Contraction
JESC - Junctional (Nodal) Escape Beat
J2 - Junctional Couplet;
J3 - Junctional Triplet;
JBI - Junctional Bigeminy;
JTRG - Junctional Trigeminy;
JT - Junctional Tachycardia;
RECP - AV Reciprocating Tachycardia;
RNTR - Reentrant AV Nodal Tachycardia;
WAP - Wandering Pacemaker From The Sinus Node To (And From) The A-V Node;
IRYE - AV Junctional (Nodal) Escape Rhythm;
IRYA - Accelerated Av Junctional (Nodal) Rhythm;
- Block - contains the following annotations:\ AV1 - First Degree AV Block;
AV2I - Second Degree AV Block Type I;\ AV2II - Second Degree AV Block Type Il;
AV3 - Third Degree AV Block;
AVDI - AV Dissociation With Interference;
AVDS Isorhythmic AV Dissociation;
AVDC - Complete AV Dissociation;
SA2I - Second Degree SA Block Type I;
SA2II - Second Degree SA Block Type II;
SA3 - Third Degree SA Block;
PAUS - Pause;
AV2 - Second Degree Av Block;
-
Pre-Excitation - contains the following annotations:\ WPWA - Wolf-Parkinson Type A;\ WPWB - Wolf-Parkinson Type B;\ LGL - Lown-Ganong-Levine Syndrome.
-
Sinus - contains the ARHY - Sinus Arythmia annotation;
-
Bundle Branch Block - contains the following annotations:\ BBB - Bundle Branch Block Beat (Unspecified);
LBB - Left Bundle Branch Block Beat;
LBBI - Incomplete Left Bundle Branch Block Beat;
RBB - Right Bundle Branch Block Beat;
RBBI - Incomplete Right Bundle Branch Block Beat;
BBLA - Left Anterior Fascicular Block Beat (Common);
BBLP - Left Posterior Fascicular Block Beat (Rare);
BBBI - Bifascicular Block Beat;
BBTI - Trifascicular Block Beat
BBBL - Bilateral Bundle-Branch Block Beat
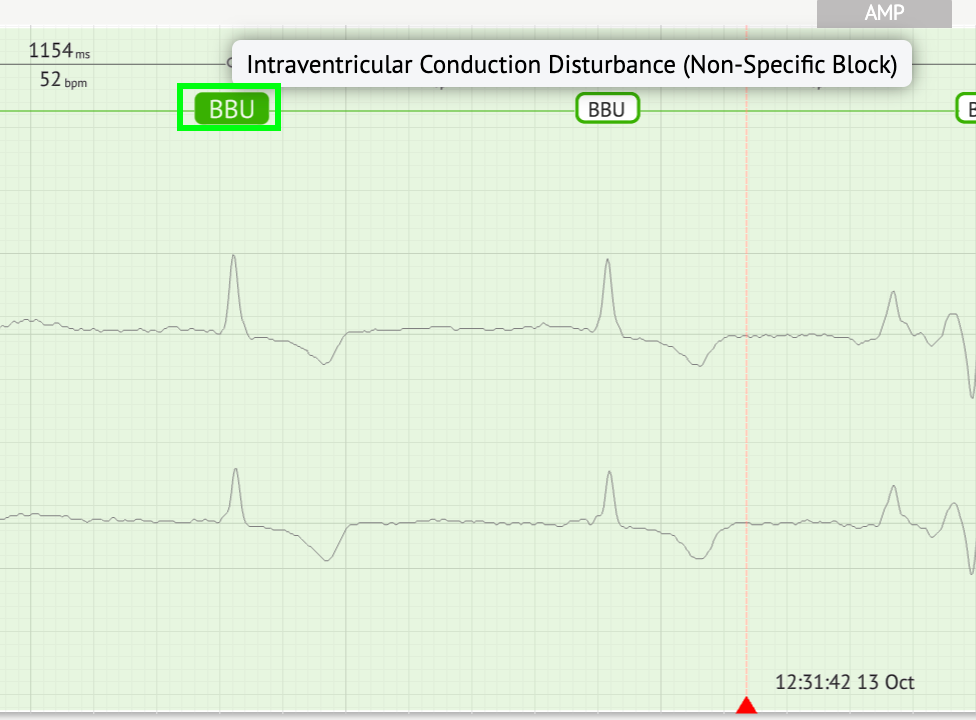
BBU - Intraventricular Conduction Disturbance (Non-Specific Block)
- Noise - contains the following annotations:\ UNK - Unclassifiable Beat;\ ZZZ - Noise (No Signal);\ Z - Noise Moderate;\ ZZ - Noise Severe;\ A - Artifact.
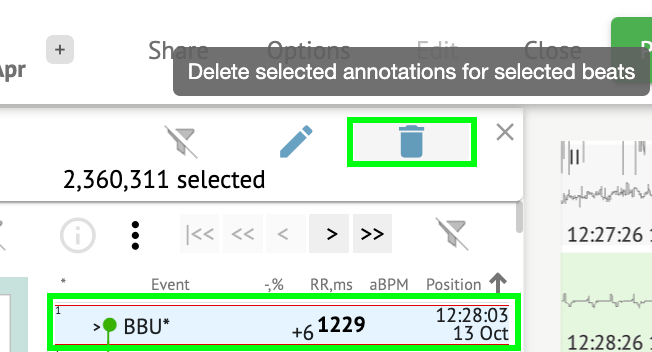
Visualizer: The option to remove annotation is available by selecting the beat > Delete selected annotations for selected beats button:
 Beats сlusters panel
Under the clusters panel, the user is enabled to select clusters of the channels to be displayed the Poincare plot.
The option to select channel is available under the Lead dropdown:
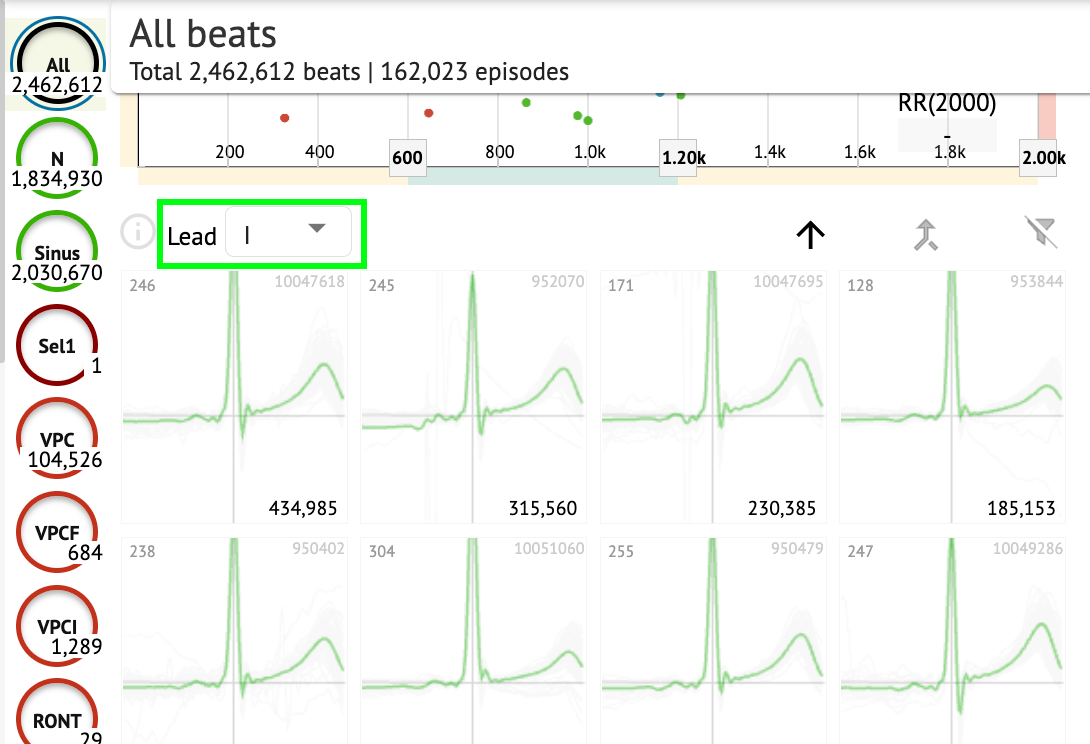
The option to select cluster is available by clicking on the available cluster:

The number on cluster indicates the number of beats within the cluster.
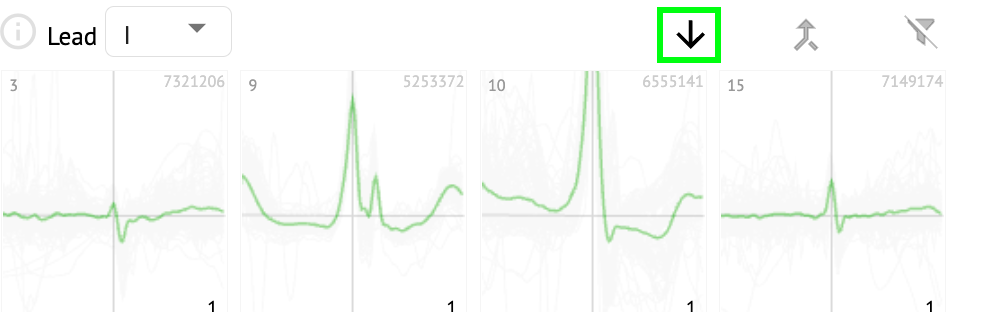
The user is enabled to filter clusters by the beat number under the following button:
The user is enabled to multi select the cluster by clicking SHIFT and selecting the clusters.
The option to reset the selection filter of the clusters is enabled under the Reset filter button:
Beats сross annotations list
Under the cross annotations list, beats are grouped by the events (annotations), and the quantity:

The user is enabled to select the events by clicking on them. The option to reset the selection is available under the Reset filter button:
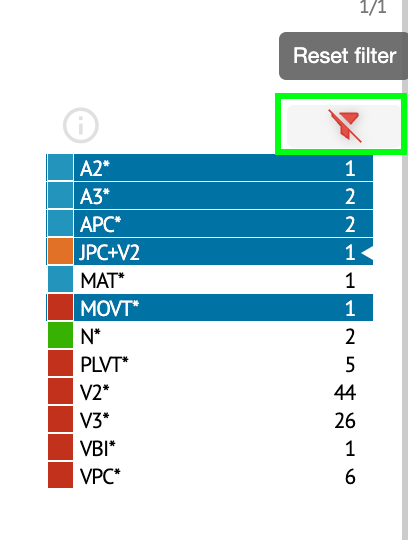
Cardio.AI indicates the cross-annotations with the following indication:
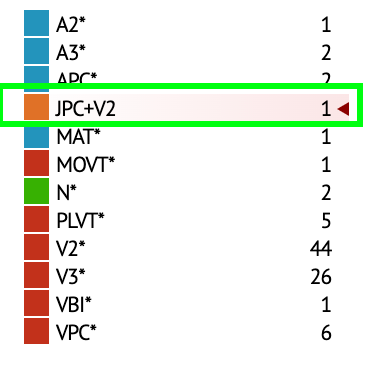
The cross-annotations must be reviewed by the healthcare professional.
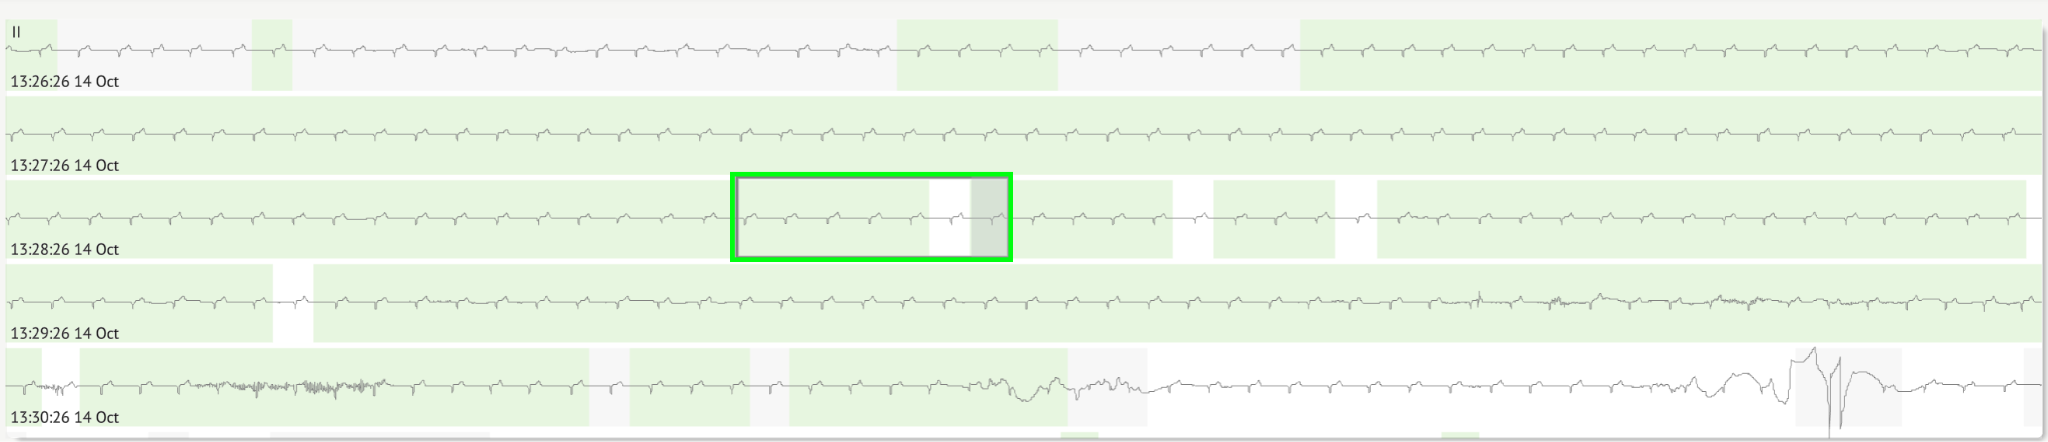
ECG Viewer Previewer
Previewer of the ECG viewer displays the area in which multiple hearts beats are included:

When enabled in options, Previewer includes the color coded annotations.
The left side of each row displays the date and time of the recording section:
The user is enabled to navigate via the Previewer by clicking on row area:
ECG Viewer Visualizer
Under ECG Viewer Visualizer, the user is able to observe and manage beats and annotations correspond to Previewer and Editor.
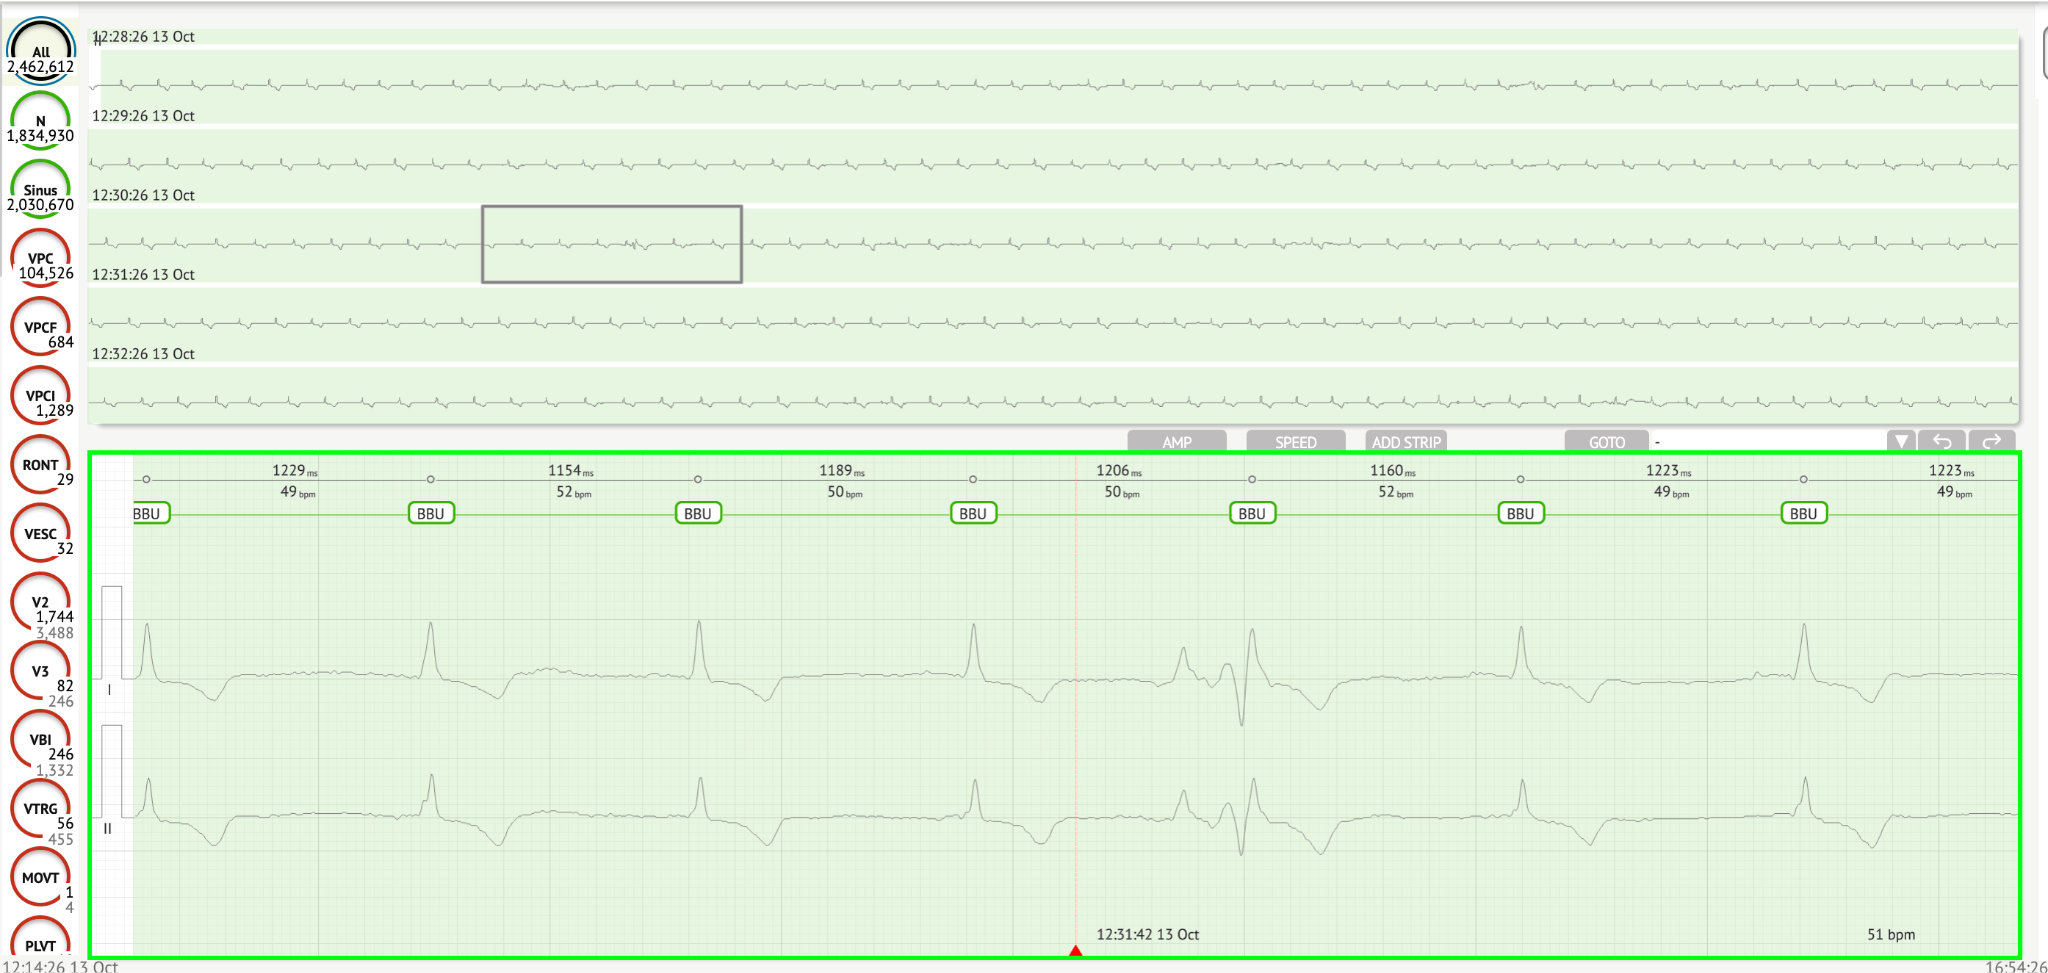
Detailed ECG data section contains the preview section of the ECG divided into parts for each minute of the ECG recording for the whole ECG recording period:
The user is enabled to choose the period by scrolling and choosing the required period. Chosen period is highlighted at the bottom detailed viewer section:
The option to select a beat is available by clicking on the beat 
The applicable annotation to the beat set by Cardio.AI is available at the upper side of the beat, and shows the name by hovering the cursor above:
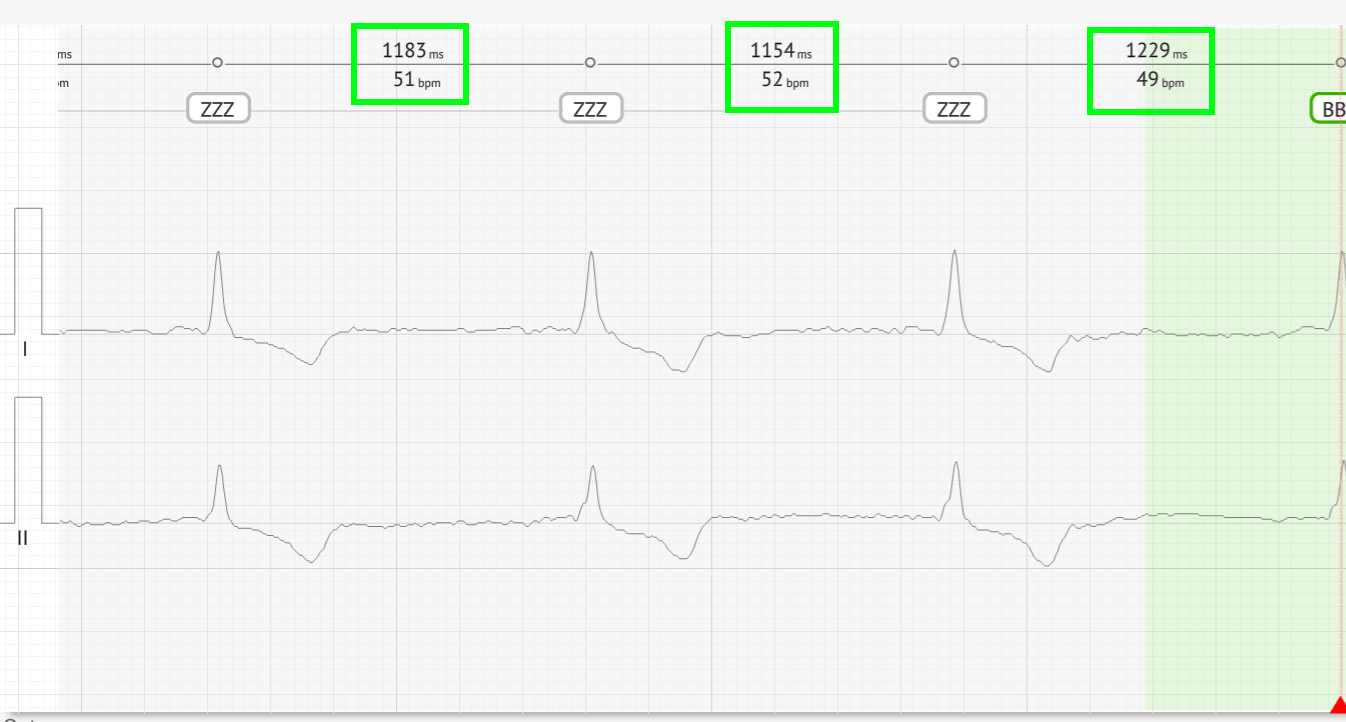
At the visualizer, there is a line at the top: a parameter at the top of the line indicates the distance between the beat and the one on the left; a parameter at the bottom indicates the average BPM:
Under Visualizer, the user is enabled to measure the AMP by clicking the beat > clicking AMP button > Click the left mouse button on the Visualizer beat and swipe the cursor up or down:
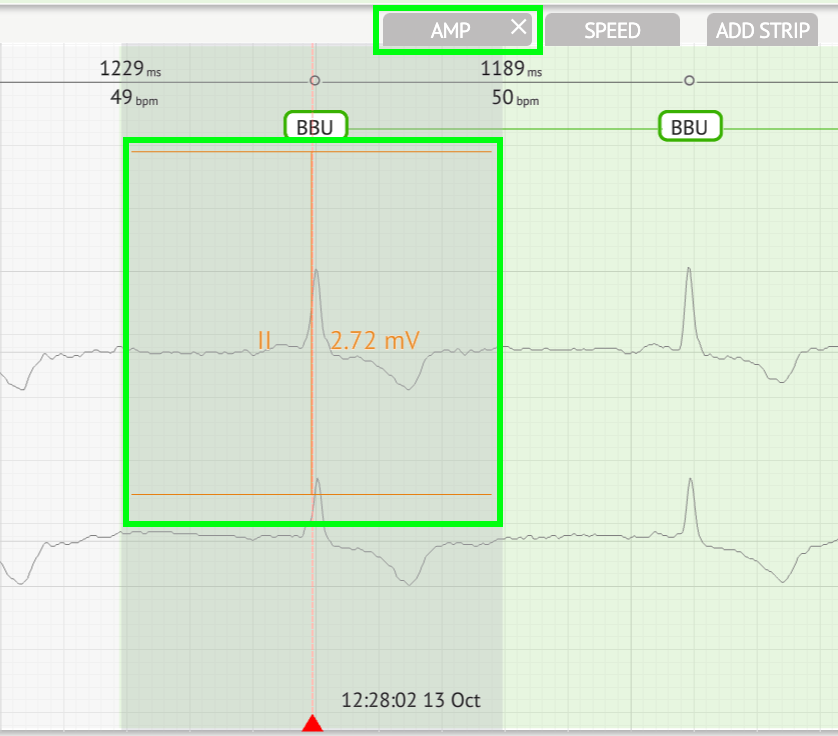
The user is applicable to set up several AMP measurements. The option to remove AMP measurements is enabled by clicking the X button under AMP button.
Under Visualizer, the user is enabled to measure the speed by clicking the Speed button > Click the left mouse button on the Visualizer beat are and swipe the cursor left or right:
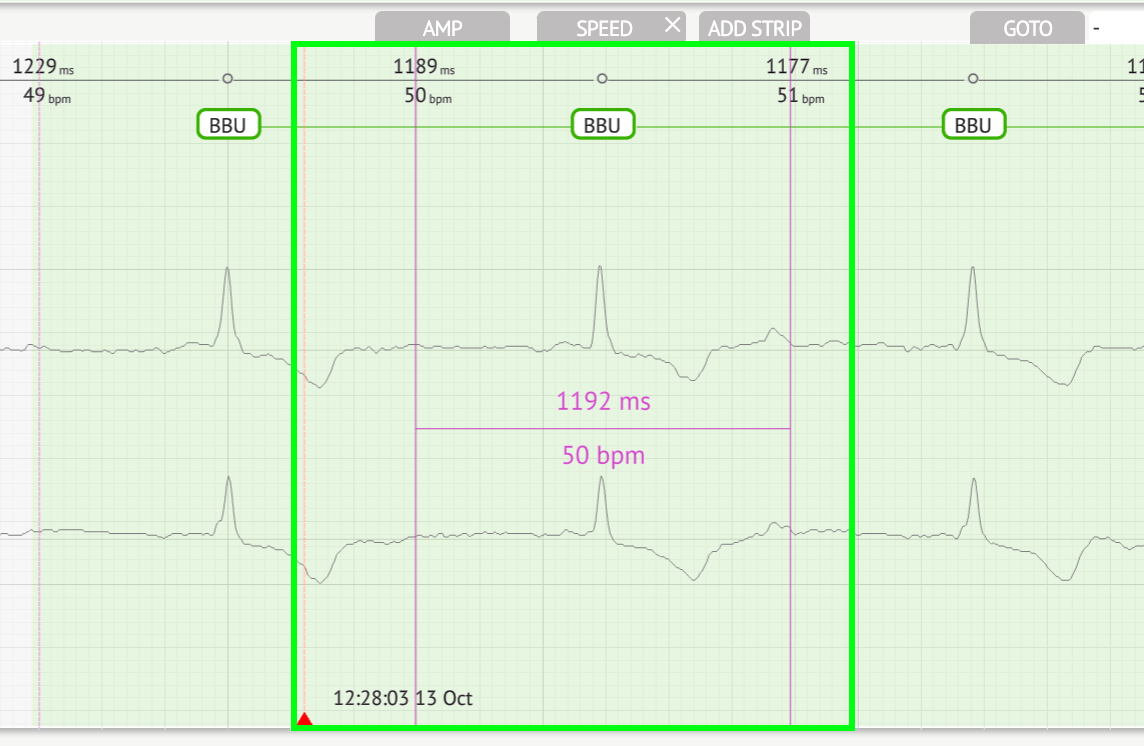
The user is applicable to set up several speed measurements. The option to remove Speed measurements is enabled by clicking the X button under Speed button.
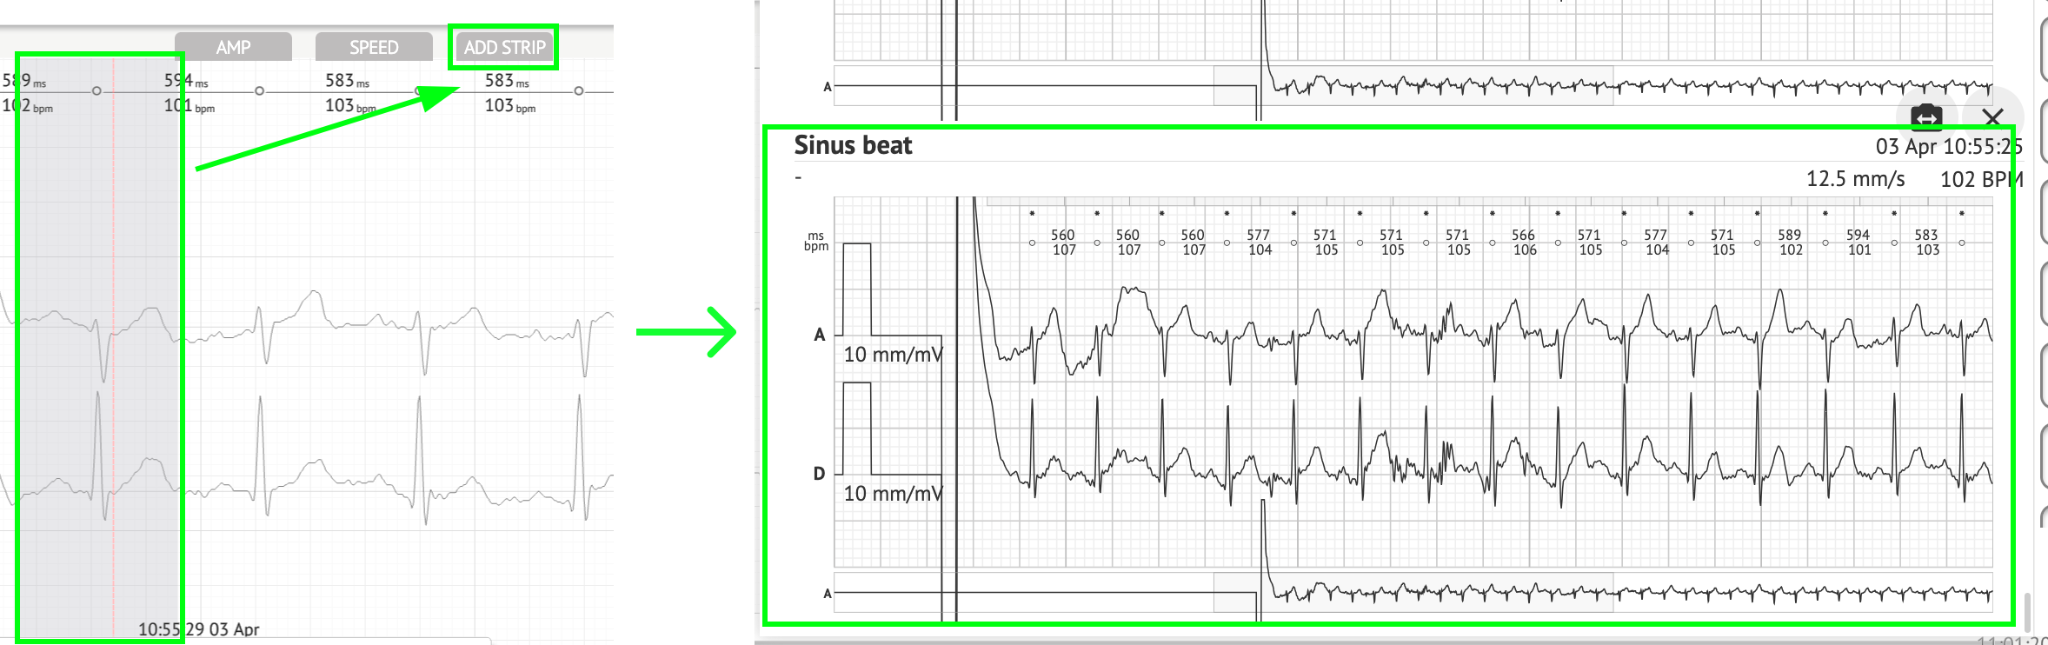
The user is enabled to add a strip of the beat to the report by selecting the beat > Add stip button:
The option to navigate to a certain time / sample is available under Goto button > Select Date and Time > Enter the Sample number > Go button:

The option to view PQRST measures recognised by AI is available by double clicking on the beat:

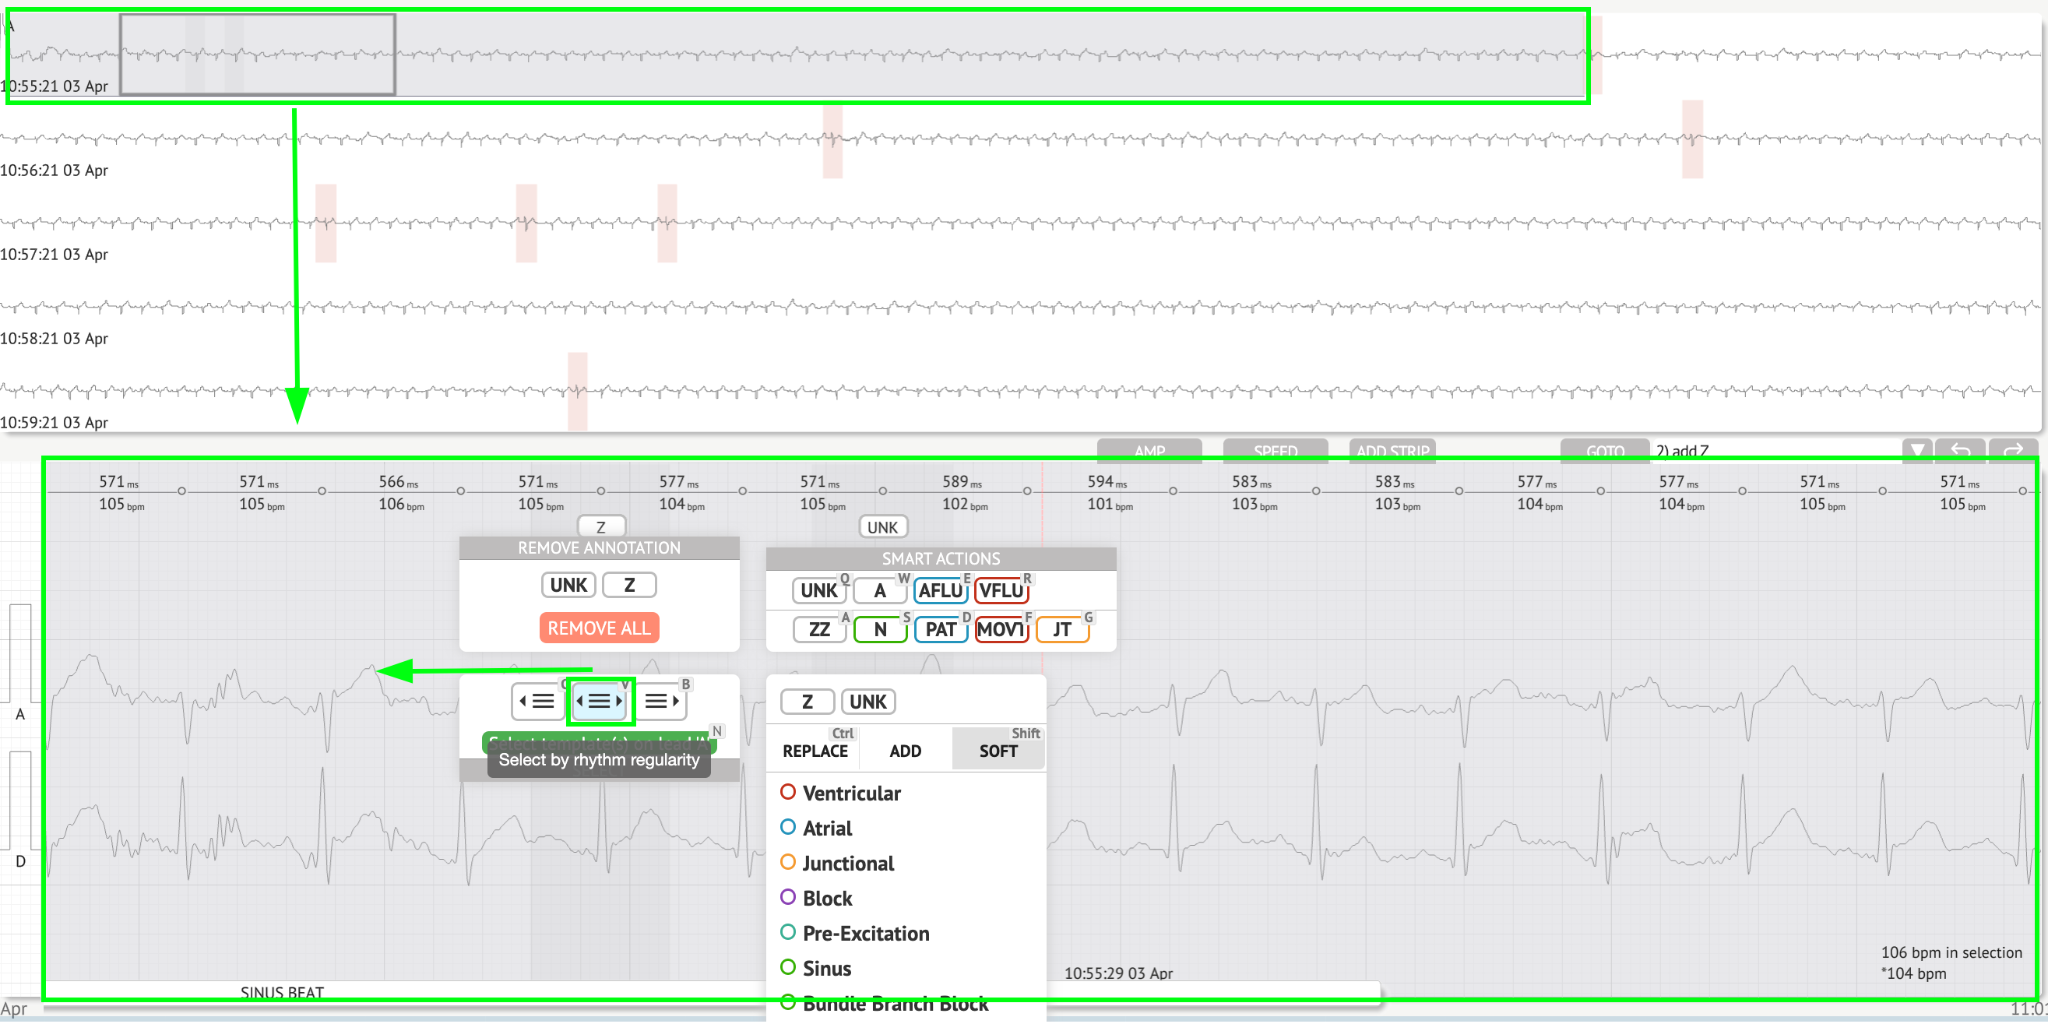
The option to access Editing menu is available by clicking on the right button at the beat:
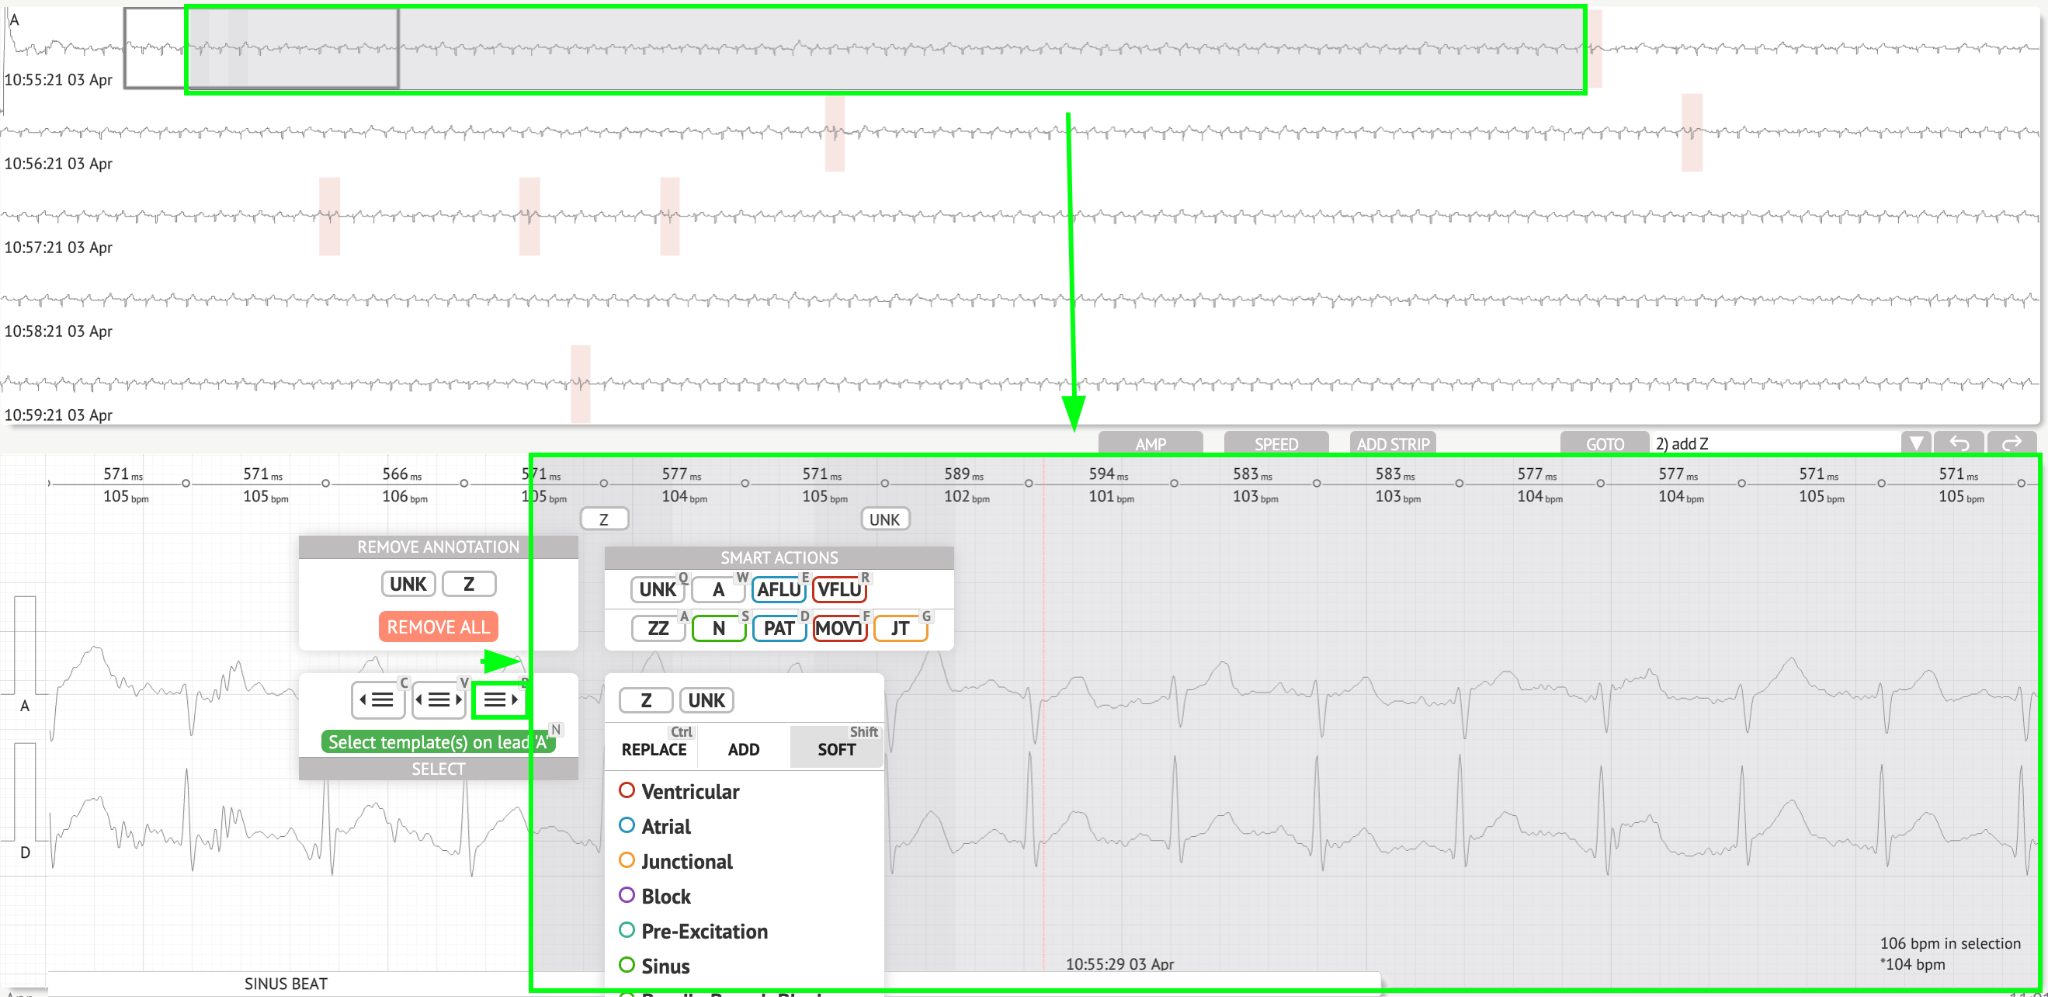
Under Editing menu, the user is enabled to select the beats by the rhythm regularity. The following actions available:
-
Select by rhythm regularity, left:\

-
Select by rhythm regularity:\
-
Select by rhythm regularity, right:\
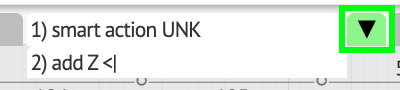
The user is enabled to browse the history of recent actions under the following field:
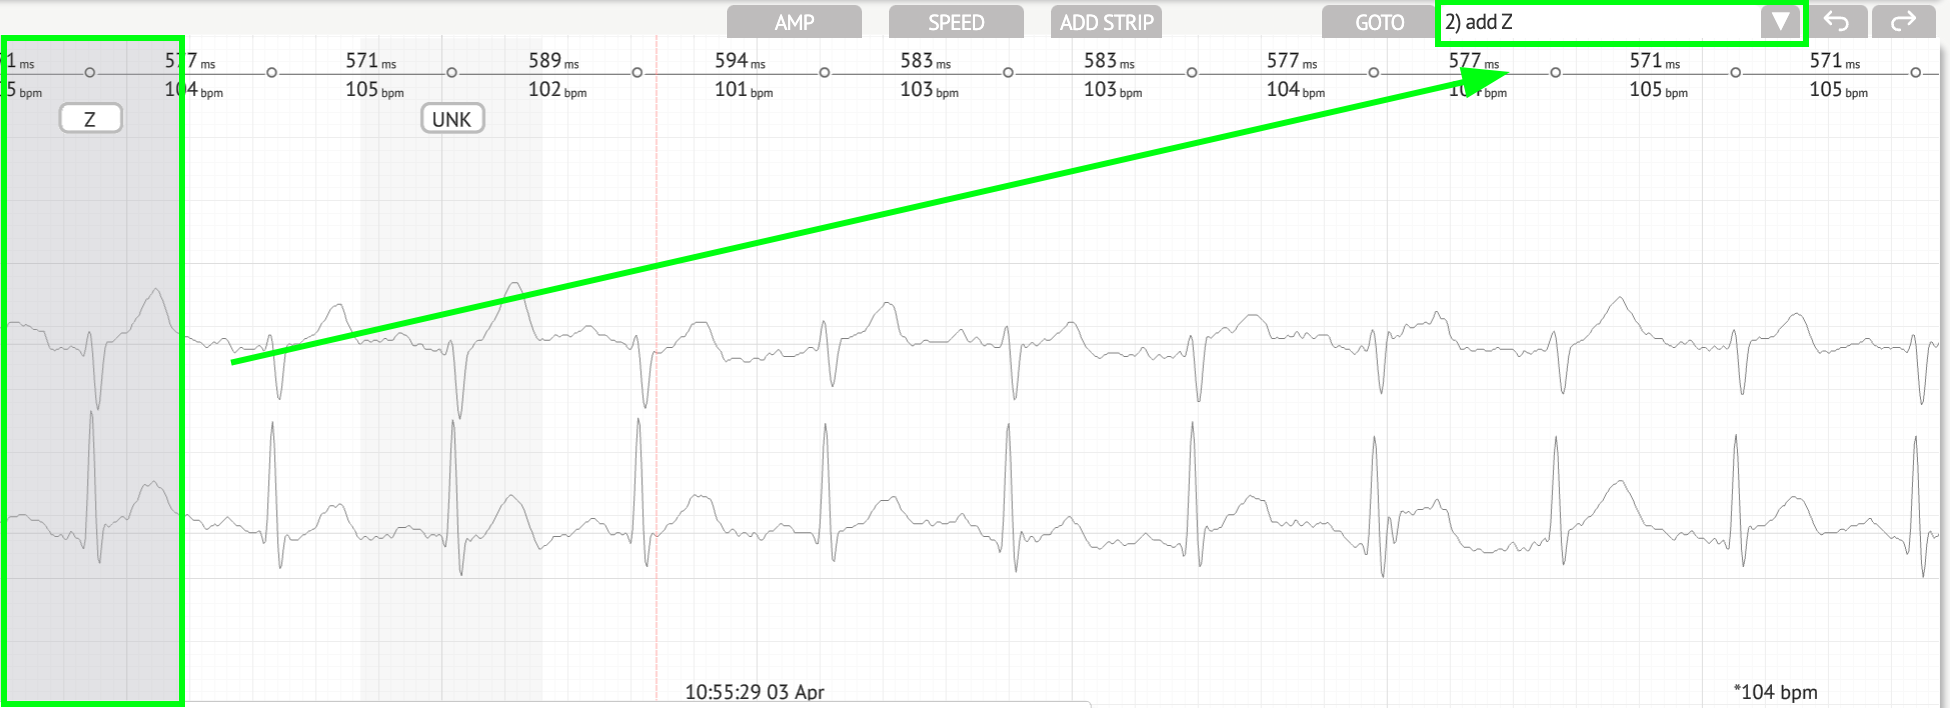 \
\ 
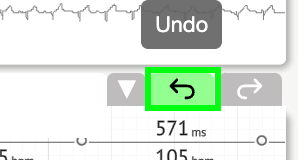
The option to undo changes is available under Undo button:
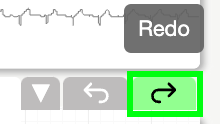
The option to redo changes is available under Redo button:
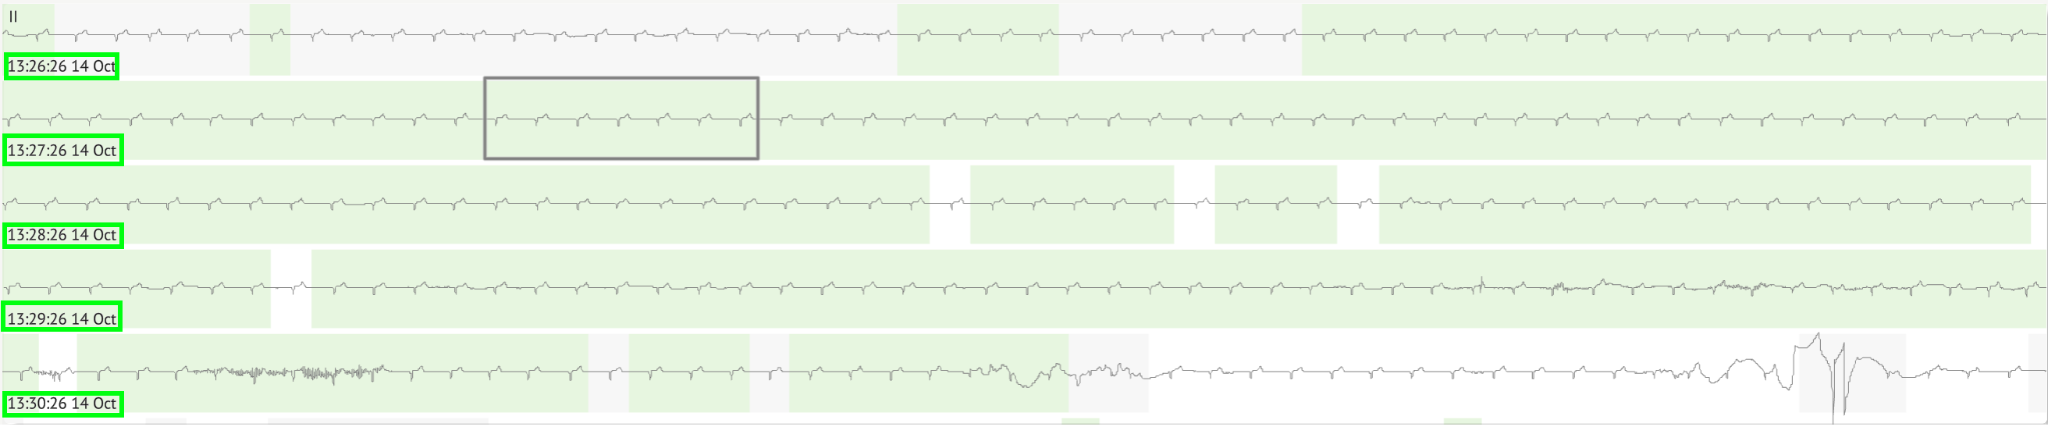
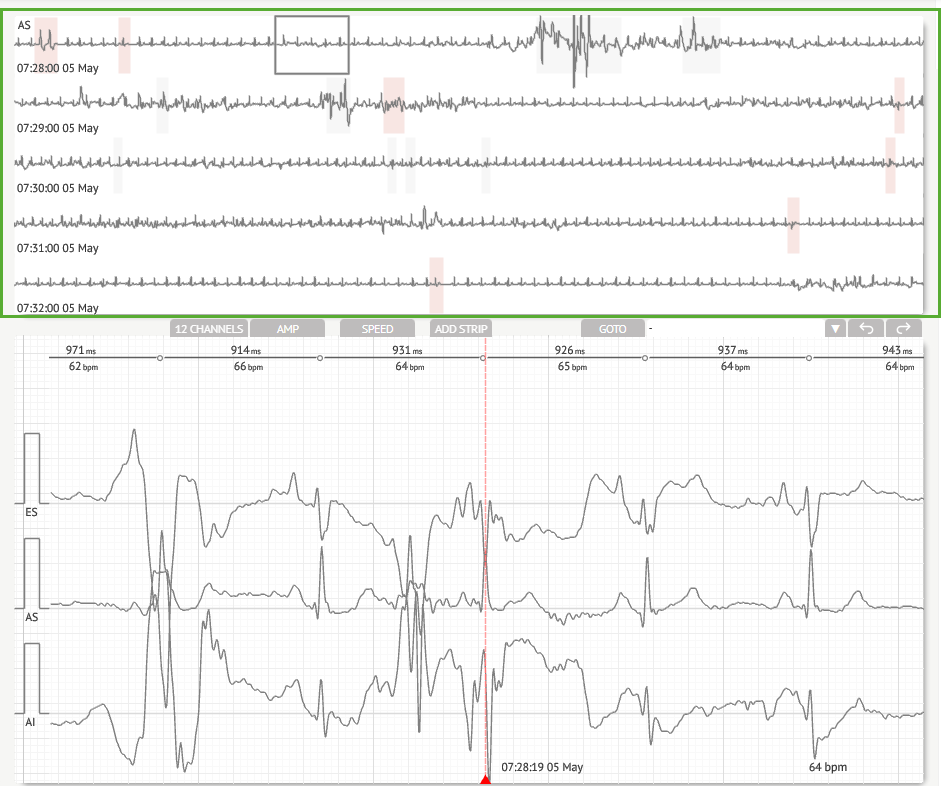
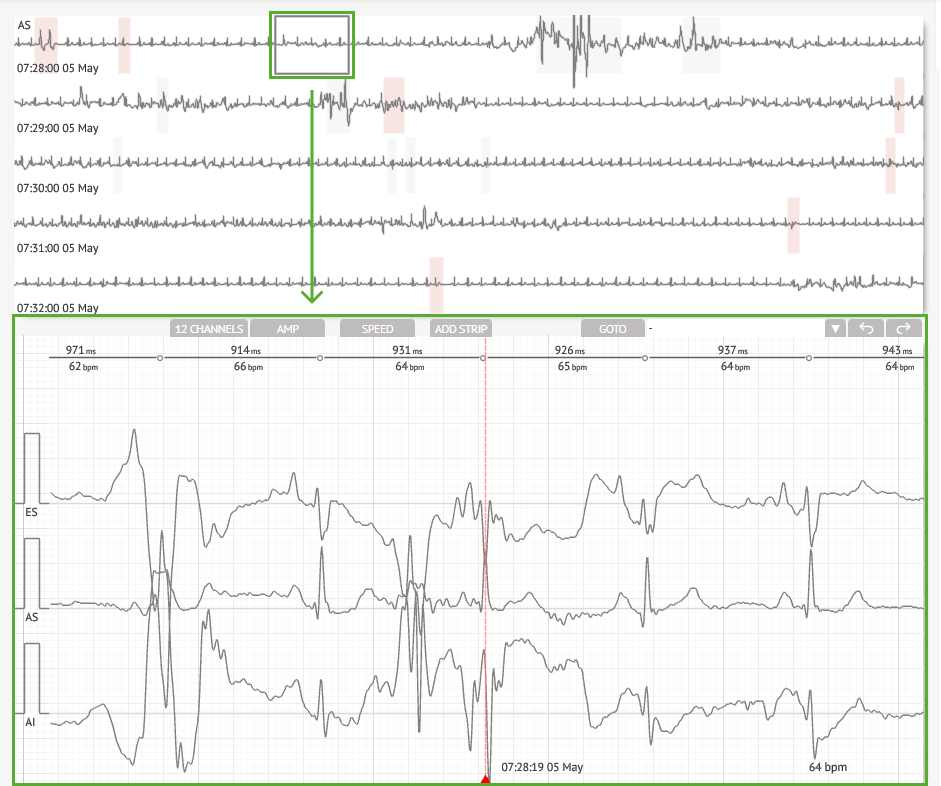
ECG Viewer bird view
XOresearch Cardio.AI enables a user to check and navigate to the events during the recorded ECG day and night periods via bird view:

Time appears above the bird view section when hovering over the selected fragment.